New Digs

So, a new PC can be exciting, but also daunting. In my case, when taking over a computer from someone who put it together but didn’t look close at the finer points, there’s some research to do.

On my old PC it had originally come with a 250GB WD Green SATA SSD, which I swapped out for a few 250GB Samsung 850 EVOs before realizing that the motherboard had NVMe m.2 slots on it. This was the first computer I’d had with m.2, and when I purchased a few 1TB WD Blue and Black drives I made a brief attempt at moving Windows to one, but that ended badly, so I just kept the OS on the Samsung until later using Clonezilla to duplicate it to the M.2 Evo 860 on the Startech card. SATA vs NVMe drivers in Windows is a thing.

So with the new PC I made a boot disk, deleted all of the existing partitions, and mistakenly installed my OS onto the Gen5 SSD. This was only a mistake because my OS doesn’t really need to be on the fastest disk, as Gen4 speeds are crazy good and operating systems are by default a bit laggy and some patience is needed. I’d set up the PC and even started installing games before pausing, realizing what I’d done, and setting about doing it all again.

This time, after moving the downloaded games to one of the SPCC 2TB SSDs I nuked the Gen5 and installed Windows onto the first of the two SPCC disks. This went very quickly, using a little trick to bypass logging in with a Microsoft account, and I was back in business .

One of the frustrating things about the computer, as bought, was that the fans were LOUD. The Montech King 95 Pro has six 120MM aRGB fans, and add to that the three fans on the 360mm water cooler radiator. Nine fans is a lot, and it was loud. I’ve had a lot of experience with BIOS fan adjustments so I went digging and was able to quiet the three fans on the radiator, taking them from 3000 to 600rpm was a huge relief, but the work wasn’t over.

I continued to set up the computer, playing some games and enjoying the absurd frame rates, quality, OLED screen contrast and quality, and generally enjoying the experience. I started with the speakers, which sound quite good, but had to be a little bit noisy over the lingering fan noise.

However, there was also something else I wanted to fix, LED control. Modern computers have so many lights, but a unified standard means that most of them can be controlled from a single piece of software, in this case MSI Center, as I had a MPG Z790 Carbon WiFi motherboard.

Some tinkering soured in the software got me one tab with fan controls, and one with Mystic Light, their LED control. Frustratingly the LED controls only let me change the color and pattern of the logo to the left of the CPU, which was fun, but not what I was after. I did see that the RAM LED strips were another sub-tab and I was pleased that I could adjust those to another pattern.

Missing entirely, however, were the six Montech fans on the side, bottom, and rear. Some searching found an excellent and insightful post on Reddit that informed me, and others, that the front panel button below the power button was LED control, not a Reset button as I’d thought. When held for 3 seconds the fan controller was put into a mode letting external software control it. I’d likely have found this if I had a manual, and if Montech still had them available on their website. Thank you Manualslib or whatever site I later downloaded it from.

Now, in MSI Center’s Mystic Light section I was able to change the color and scene of all LEDS finally. Success was sweet, but now back to the other problem, as no tinkering was seemingly able to fix that yet.

Another search yielded the fix, which is so simple that I laughed when I saw it. Power from DC is, well, direct, and doesn’t have a frequency like AC. The replacement for frequency in a wave when you don’t have a wave is a pulse. PWM is used instead of a constant current, and can let you control something by giving it less power over time, slowing it down.

I simply needed to go in to the BIOS, enter the fans settings, and switch control from DC to PWM. Immediately the fans all slowed to a crawl, as I’d set them to, with very much exponential curves versus straight lines. The relief was immediate and finally I felt as though the PC was mine. I had conquered LEDs, fans, disks, and the setup was now feeling solid.

Moving Time

As mentioned in the last post, I got a new PC, but what do you do with the old PC? In this case I’m selling it to a family member who is younger, going to university, and whose game usage is much less graphically intensive than mine. Passing on savings is also a nice thing to do, especially for family.

Backing up whatever you have on the computer is of course the first step. I rounded up what I needed to move and dropped it on to my NAS, which you can read about here.

After that, it’s going to be a matter of pulling out a few things from the old PC and putting a few things back in. SSDs are being swapped, and the WiFi card is going back in, because there’s no guarantee of easy Ethernet access in the dorms.

I’ll be removing my 4TB Crucial disk on a Startech adapter, paired with a few m.2 SATA Samsung Evo 960s in 250GB flavor. This will probably get broken down into the big drive itself and mounted on the new PC’s motherboard, which has an incredible 5 m.2 slots. I’m sending the old PC away with a 500GB and 1TB SSD, which should do very nicely.

One of the handy features of Steam’s library management is the ability to add disks, then move games between them. This usually has little consequence, though there’s usually the new install prompts once again and some settings may reset. My experience has been very positive, and I’ve been filling the big drive with all of those downloaded games that I want to maintain.

Don’t forget, however, to back up your Documents folder, as it has a lot of the save game files that some older games do not back up in Steam Cloud. One of my favorite go-to games, Crysis 2, works like this. It seems that some of the stats are backed up, but none of the saves and other small things.

I also like taking game screenshots while playing games and while I used to back these up to Steam, I stopped doing that and instead copy them to Google Photos and put them in an album. It’s kinda like a “what was I doing / playing / feeling like” in that month or season. Fun to look back on at times. Steam makes it pretty easy to find these on the disk from their interface when you open a screenshot, right click on it, and select the option to show it on disk.

One of the other interesting things about backing up a computer you’ve had in place for 5 years is that you find out what’s been using space. I’d had a Premiere Pro folder with 24GB of audio preview files, and it wasn’t even the newest version. Those were simply abandoned by the software and left. I’d also had a few Audacity mixtape projects using 15GB that I’d forgotten about.

New to Me

I was going about the process of researching used replacements for my display setup at home on my gaming / video processing / other PC. I’d been using an AOC 24” curved WFHD display since 2020, and later got an MSI 30” UWFHD to use next to it, making for a very nice side-to-side curved setup. It’s worked for a long time, but for reasons I won’t get in to (and boredom) I wanted something bigger.

Used is how I go for a lot of reasons, price being a big part of it, but also I stand by the idea that if something is going to fail it will be within the first six months of it being used normally. Barring some sort of secret abuse that’s not visible or possible to perceive, it tends to work.

I was really debating the merits of a 16:9 32-34” display like the LG Ultragear, and even the 39” beast they’ve made. Wide as, or wider, than my 30”, they would make things a lot easier to read and make for a nicer editing and gaming experience. The 49” Samsung Odyssey is of course in the running, but I just couldn’t decide on anything.

One of the listings that came up showed the label on the back of a monitor, and when I looked at the ad title I saw something interesting . It was for a PC, the price had been slashed, but there were no details. I’d been mulling the thought of a new PC to replace my 9th gen Core i7 9700F and so when I clicked on the ad I was genuinely interested in what this was.

It later transpired that this PC wasn’t as first advertised, with a Ryzen 7 7700 instead of the 1390K i9 initially stated, written not in text on the ad, but along with the other details shown on a green lined note pad. The specs were good, the price was good, and it came with an acceptable LC smart monitor. I could work with this, but when I was informed of the CPU mistake I turned away.

There was also a local seller with a genuinely interesting alternative. It did indeed have the slightly slower i5 13600K CPU, and with a similar GPU, but with a tick down in spec. A very nice case, 27” display, and solid specs for the cost. However, they didn’t respond in a timely manner to my several inquiries, so I looked again.

This ad was even more intriguing. It wasn’t as well represented as the second one, but the price was similar, and the specs were incredible. A Core i9 14900K, 64GB DDR5, RX 7900 XTX 24GB, 2TB Gen5 Crucial NVME, two 2TB Silicon Power Gen4 SSDs, and in a nice Montech King Pro 95 case full of aRGB fans and a water cooling setup. My mind quickly did the math and I had to message this person, who was again quite local.

A quick response came, and within 30 minutes I was meeting at his apartment. He was a new young father getting into information security but needed out of the setup. I poked around at it and him a bit, finding that he did indeed know what he was talking about, and the PC was indeed genuine. He’d built it himself, I suspect using many parts sourced in the past two years from a local place that gets items sold in lots.

He’d had it connected to a nice OLED AOC 27” WQHD monitor and an WFHD Acer 27” next to it, all on a desk. Because I’d already talked to a family member about selling my current PC fully, I was curious about whether this seller would be interested in parting with the whole setup. He was, and after a few negotiations we settled on a price.

I pretty much took everything, really. This included HyperX headphones, EVO80 mechanical keyboard, Razer Deathadder Pro mouse, gaming pad, Shure SM7 mic with stand, GoXLR mic interface, Kensington USB-C dock, Edifier speakers, the two monitors with VESA stands, a standing desk unit, the desk itself, and a gaming chair. I mean _everything_, including many cables. What I did not get was spare parts and boxes and other accessories that I may want or need later, but that is a trade-off of buying used.

So, well, that escalated.

Between the two of us, with two cars, and a trip to the bank for cash, we got everything moved quickly and safely. I now had to wrap my mind around what I’d done and figure out what to do. And that’s for another entry, because it’s still not done, and there are some details to add on which haven’t even happened yet.

Back in the early days of “smart” phones, I jumped in headfirst with a pretty revolutionary device from a startup brand called Danger. They made this quirky phone with a wacky OS, full keyboard, and a screen that flipped around and up. It was called the HipTop, and was available on T-Mobile as the Sidekick. Monochrome screen, 2G data, a Kyocera detachable camera, and some weird and funky features onboard.

After some teething issues and a realization that I wanted something color, but more reliable, I jumped ship to HTC in the form of a series of their T-Mobile phones running Microsoft’s Windows Mobile. The first one didn’t even have a touch screen, and the later ones were progressively more useful and hackable. I recall putting the Orange UK ROM onto my HTC Wing and how fun that was.

Skip forward to the introduction of Apple’s iPhone and it really did seem like color screens with touch and wireless capabilities were catching on. There was contempt from some in the BB camp about the lack of a physical keyboard, but that didn’t end up being an advantage once people and software got better. The path forward was becoming clear and I was ready. Almost.

The original iPhone was an AT&T exclusive, while still costing hundreds of dollars, and so changing networks was a requirement that I couldn’t see happening. I’ve had the same mobile plan since about that time and it’s been a good ride on the Magenta train, for the most part. I had to wait, but not long, because my HTC love extended to the world of green in the form of the T-Mobile G1.

I have a love/hate relationship with Linux, and Google, and many other things, but the package of the first Android device seemed to be a solid one, if not quite a match for the iPhone. A capacitive screen with the optional slide-out keyboard was a nice compromise, though it made the phone quite thick, but it bridged the gap between HTC’s older, classic devices, and what would come. Getting a device with a 1.0 version software was a bit of a risk, but how bad could it be?

Not bad, as it happened, and the combination of a solid hardware base and a respectable software start meant that I eventually owned four of them in three different colors for many different reasons, not all sensible. I did give up on Android briefly when the shiny sparkle of Maemo from Nokia glittered too bright for me to resist, but reality slammed fully into me when the Nexus One was announced and I ordered it.

Thus began a long line of Google’s Nexus devices, including that Nexus One, the Samsung Nexus S and Galaxy Nexus, and finishing with the trio of LG Nexus 4, 5 and 5X. The last one broke me, however, after years of being a huge Android fan and mostly an iOS hater. I’d cracked some years previously when I first used an iPad and realized how it was shockingly superior in every way to any and every Android tablet I’d owned, but I wasn’t ready to jump ship on my daily phone. Yet.

The Nexus 5X and 6P were the last straw. I didn’t want a Chinese phone, and I’d really liked the Nexus 5. I still consider it the best Nexus phone by a big margin, but the X tacked on to a warmed-over model was a bad move, and it was the worst Android experience I’d ever had. I took stock of what my options were and it was clear that going forward iOS was the best option. Samsung isn’t a company I’m interested in using with their skin and look. Never. HTC was basically floundering in a pool of its own drool and vomit. Motorola wasn’t sure what was going on and may have just been sold to Lenovo.

The iPhone 6 was a pretty dramatic step forward in the Apple design language. Some would say it was backwards, as the iPhone 4 still holds up as a design, but the 6 is the phone that the phone you’re holding was probably more influenced by than any other. the S line bumped the specs in many ways, and it had been out for a few months at the time. I was able to find a 6 S Plus for a very good price and so I did what I never thought I would.

That was ten years ago as of writing. Many things have happened since, including the brief period in which Google abandoned the Nexus line and introduced the far better Pixel line. I don’t regret the switch, as I’ve owned a Pixel 1 and own a Pixel 6 Pro currently, but it did take them several more years to show that they could compete with Apple and Samsung.

I started with that 6 S Plus, then jumped to an 8, an X, back to an 8, then up to the 11 Pro Max, 12 Pro Max, 14 Pro Max, and finally to the 16 Pro Max I use today. I got on the trade-in-every-two-years-for-the-new-one train a few years ago and it’s been grand. I don’t have to worry about the phone I bought breaking, as it’s got AppleCare+ while I have it, and it’s a simple payment each month, and I’ve got the newest phone every 2nd year with those benefits.

What did I notice was the biggest improvement from Android? Speed. I could push the button on the camera shutter in half the time and get a better picture. Battery. I used to charge my Android phones overnight and likely need a bump in the evening. I’d carry a charger in the car to make sure I wouldn’t be without, but since moving to iOS I’ve only charged my phone in a vehicle 2-3 times in those circumstances. With smaller batteries the Apple devices are just better at optimizing. Vertical integration works, just don’t tell Samsung what they’re doing wrong or your next Galaxy will be running Tizen.

Yes, I’ve had an Android phone for most of that time. I kept my Nexus 5 and only recently sold it on eBay. I use WiGLE, on Android, which is still possible due to Android’s Developer features. Is Android as good in 2026? Maybe it’s close. The Pixel 6 Pro runs the latest version, which number I can’t remember but is probably 16, and it’s quite good. However, iOS 26 runs on an iPhone X S, which came out almost 8 years ago. This Pixel 6 Pro will likely not run any version of Android from Google higher than 17, if that. Android support for updates is better than it’s ever been, but it’s still lagging behind.

Would I recommend this to anyone? It’s up to you. I’ve had several family members stick to Android and they’re content, but several others switch and they’re very pleased. I’ve not pushed or persuaded anyone to change teams, and I won’t do it. I don’t even joke because it’s not important. Back in 2016 the difference was a LOT bigger than it is now. Features exclusive to one or the other platform are almost universally shared. AirDrop is becoming available on some devices. Do not hold your breath for iMessage though…

My next phone will be an iPhone, but I’ll always have an Android because it’s interesting to see both sides. I would recommend you do the same, in either configuration, so you know what’s going on.

I still remember going on my first international flight. The constant bombardment of noise was overwhelming and even with an entire row of seats available to myself I absolutely could not sleep due to how noisy it was. When I travelled more frequently years later I got some of the early Philips noise-cancelling wired headphones. This made travel much easier, and though I figured out that I just don’t sleep on planes, being awake and buffered against the noise was a positive.

I found out that I was going to be going to the Middle East last year and also doing a DJ gig, so I took the opportunity to do something I never thought I would: get some AirPods Max.

Why? Well, my well-used and reliable AirPods Pro 2 wouldn’t last more than 5 hours at a go and I needed some backup, with even more battery life, and some flexibility. The bigger drivers should sound better and the recent changes and improvements made to them meant that I could use them with my DJ gear. Apple made a unique USB-C to 3.5mm cable, as these are the 2024 model and were upgraded, that means the DAC in the cable needs to be bi-directional. In normal use a cable in this configuration would act as an interface with a device, meaning that you can use it to plug in to a phone, tablet, or computer and output audio to the 3.5mm. In this case it’s the opposite, with the 3.5mm plug being the source. It’s a little bit expensive, but at 2m it’s plenty long and very well made.

I got these headphones at a discount after some research into buying them used or refurbished. Apple has a store on Amazon that sells them as returns, checked over and certified with a 90-day warranty. I picked the nice blue color and had them in a few days. The weirdest thing was setting them up because they didn’t want to pair immediately. I was hoping that it wasn’t a problem, and a little research led me to find out how to “hard reset” them back to defaults. It’s amazingly easy, and maybe in a bad way, but after doing this reset I was able to pair and use them.

They don’t disappoint. Lots of full range goodness and the fit is nice. I have somewhat large ears and they don’t fit completely inside the cups without touching either front or back, but it’s one of those things you get used to. Also I had to reverse the volume adjustment direction on the Digital Crown to suit my mental map of how it should work. Apart from that all was well.

The trip went good. I did find a few quirks with the headphones and the DJ software I was using, but when used as intended all went very good. They were very effective on the long flights at keeping the noise at bay and I probably slept a little bit while wearing them. I also use reading glasses and the pressure of the headphones over them is something I am used to, but it does get tiring.

On the trip back I did have some quirks happen again and I seemed to have to charge them once more unexpectedly. This behavior kept happening when I’d leave them for a day or two in my bag. The charge state when they were put in their “case” should stay somewhat stable and only decrease slowly over time. The case itself has a magnet in it that the headphones use as a cue to go into a deep sleep state, which they wake from in seconds then pair.

Strangely, after the trip, after a charge session I would find that they’d be significantly drained or down to a %1 charge after a day. This happened on multiple occasions, and I was not sure why. They did seem to stay connected to my phone, even while in the case, and I thought that this was probably related to the charge drain, but I wasn’t sure what could prevent this from happening.

I was very late to iOS 26 and waited till version 26.3 was released before making the step from iOS 18. I hoped that this would alleviate the problem but it did not. I also use the setting on all my AirPods to only have them connect to the device last connected to. This makes sense to me because the “intelligence” that Apple tries to use to move AirPods around from one device to another isn’t something that I ever want to happen. I’m writing this while on a computer, listening to music from my iPhone on the AirPods Max right now and the idea that Apple would move the AirPods to the computer simply doesn’t make sense in all but the most edge case.

So, what next?

I was pleasantly surprised when I got the AirPods Max to find that they had AppleCare until the following July, so that was something I could fall back on after the warranty from purchase ended. Some more research about this problem found more users having the same complaint, going back to the early days of the device. My USB-C model wasn’t much different than those, with the core system being the same as the introductory model plus firmware updates. Clearly those fixes hadn’t addressed my problem, and these threads on message and support boards included recent complaints and queries.

So I finally resolved to reset the device again to defaults. This is a simple process.: Hold the Digital Crown and mode button down, and keep holding while looking at the LED light to change from amber to white.

https://support.apple.com/en-us/119838

I then paired them again to my iPhone and set things back up with the same custom device name, settings, and other little things like “connect automatically” as mentioned above.

As I write this it’s been a few weeks since I did this second reset and after not using the headphones for several days and pulling them out of their Smart Case I found that there was still %49 battery available. This is the expectation and how it should work.

So, if you’re having issues with your AirPods Max follow this step and you’re likely to not need service from Apple or anyone else.

I was recently given a PC by a former colleague whose child was using it. They upgraded, so getting rid of some old computer is easy if someone is willing to take it, make sure that the data is erased, and dispose of it.

Thing is, this was an OK PC. Nice case, MSI motherboard, DDR3 RAM, Intel i5-3570K CPU, 250GB SSD, and a 1060 6GB Nvidia card. Gee, it would be a shame to let this go to waste. I got quickly to reinstalling Windows 10 on the system, which also has a PCIe x1 wireless card, and installed Steam. Okay, that was easy. Download some games and see what happens…

Not great, considering the “gaming” PC I have is an i7-9700F with a 4060 16GB, but it’s passable in a pinch and playable with lower graphics settings. This is especially handy when your gaming PC keeps inexplicably crashing during games, most notably and frustratingly Cyberpunk 2077.

Now I know that Cyberpunk had it’s fair share of issues when it launched, and it still has them in mid-2025, but crashing isn’t one of them. I’ve played many hours of this game on a 10th gen Intel with a mobile 2070 and it’s been flawless, and like many tech people we’re far more hesitant to reinstall operating systems on computers we use than for others.

Windows 10 is also nearly at the end of it’s support, so I figured that trying out Ubuntu linux with Nvidia drivers and Steam’s emulation experience with games made for Windows would be easy to do on the backup PC. How hard could it be? Not too, but it wasn’t easy either.

I grabbed another SATA 250GB SSD and plugged it in, removing the SATA cable from the Windows drive first, then booted to the Ubuntu 24.04 LTS installer and got to work. Installation took longer than I expected, but given that this CPU is over 10 years old I was patient. On rebooting things looked good. I installed Steam from the store, then got logged in and started the 55GB download.

I was disappointed when I clicked Play that it synced the cloud save, then seemed to start, but went immediately back to Play. No messages, no windows, just a loop. Great! How unexpected. Linux strikes again! We go way back, so 30 years of disappointment isn’t misplaced.

Okay, so now what? A guide that gave a suggestion to put a few key startup parameters in place to prevent the CDPR launcher from starting, which it normally does. This is a good step, and the flags given were useful elsewhere also:

--intro-skip -skipStartScreen --launcher-skip

After doing this, well, nothing changed, so I dug deeper. On that same thread a poster said that they used those commands with a specific version of Proton, Steam’s emulation framework, so I started changing that under the game’s Properties. I finally found that Proton

version 9.0-4 would “launch” but didn’t work, however it didn’t loop. This was progress, because at least the game was theoretically running. Clicking Stop exited it, though nothing but the button visually changed.

I’d seen an error message when loading Steam that I only had the 64-bit drivers from Nvidia installed, and it recommended also installing the 32-bit ones as well. I tried this, using the instructions, but only made things even worse. That, and I likely messed up the proprietary drives that Ubuntu had previously installed. Frustrated, I gave up for the day but vowed to think about it and try again.

It seemed like the installation process went far too fast when I had “installed” the Nvidia drivers. It’s likely that I just installed some libraries, not the drivers themselves, so I went about doing that from the command line:

sudo ubuntu-drivers install nvidia:570

This took much longer than previously, and looked like it was doing something. It pauses for quite a long time at 95%, but finished convincingly with some patience in hand. That done, a quick reboot now showed my desktop once again in the proper 1080p resolution, so that was one step closer.

I checked the properties of the game once more, verified the version, and clicked Play. Once again it seemed to start, then something popped up but flashed away, then for the first time the screen went black. I waited, then waited more. 10 seconds became 20, and I did an ALT+TAB to see if things were still running. I switched back to the desktop, then returned to the game. The screen was still blank, and I paused when suddenly the intro screen appeared.

Okay, I thought, this was a step forward. Things rolled right in as though it was meant to work. The main menu loaded, and after selecting Continue on my most recent save, I waited for it to load. This also paused for quite a long time before starting the loading process, but given some recent experience with the texture loading times and pre-rendering that happens how this wasn’t a surprise.

I loaded into Kabuki, and looked around. The settings were familiar; slow and low, but pretty good. The equal of Windows, I thought, after a few minutes of jumping and dashing around. I quickly set a frame limit at 30FPS, just to be consistent, and started playing my post-ending character.

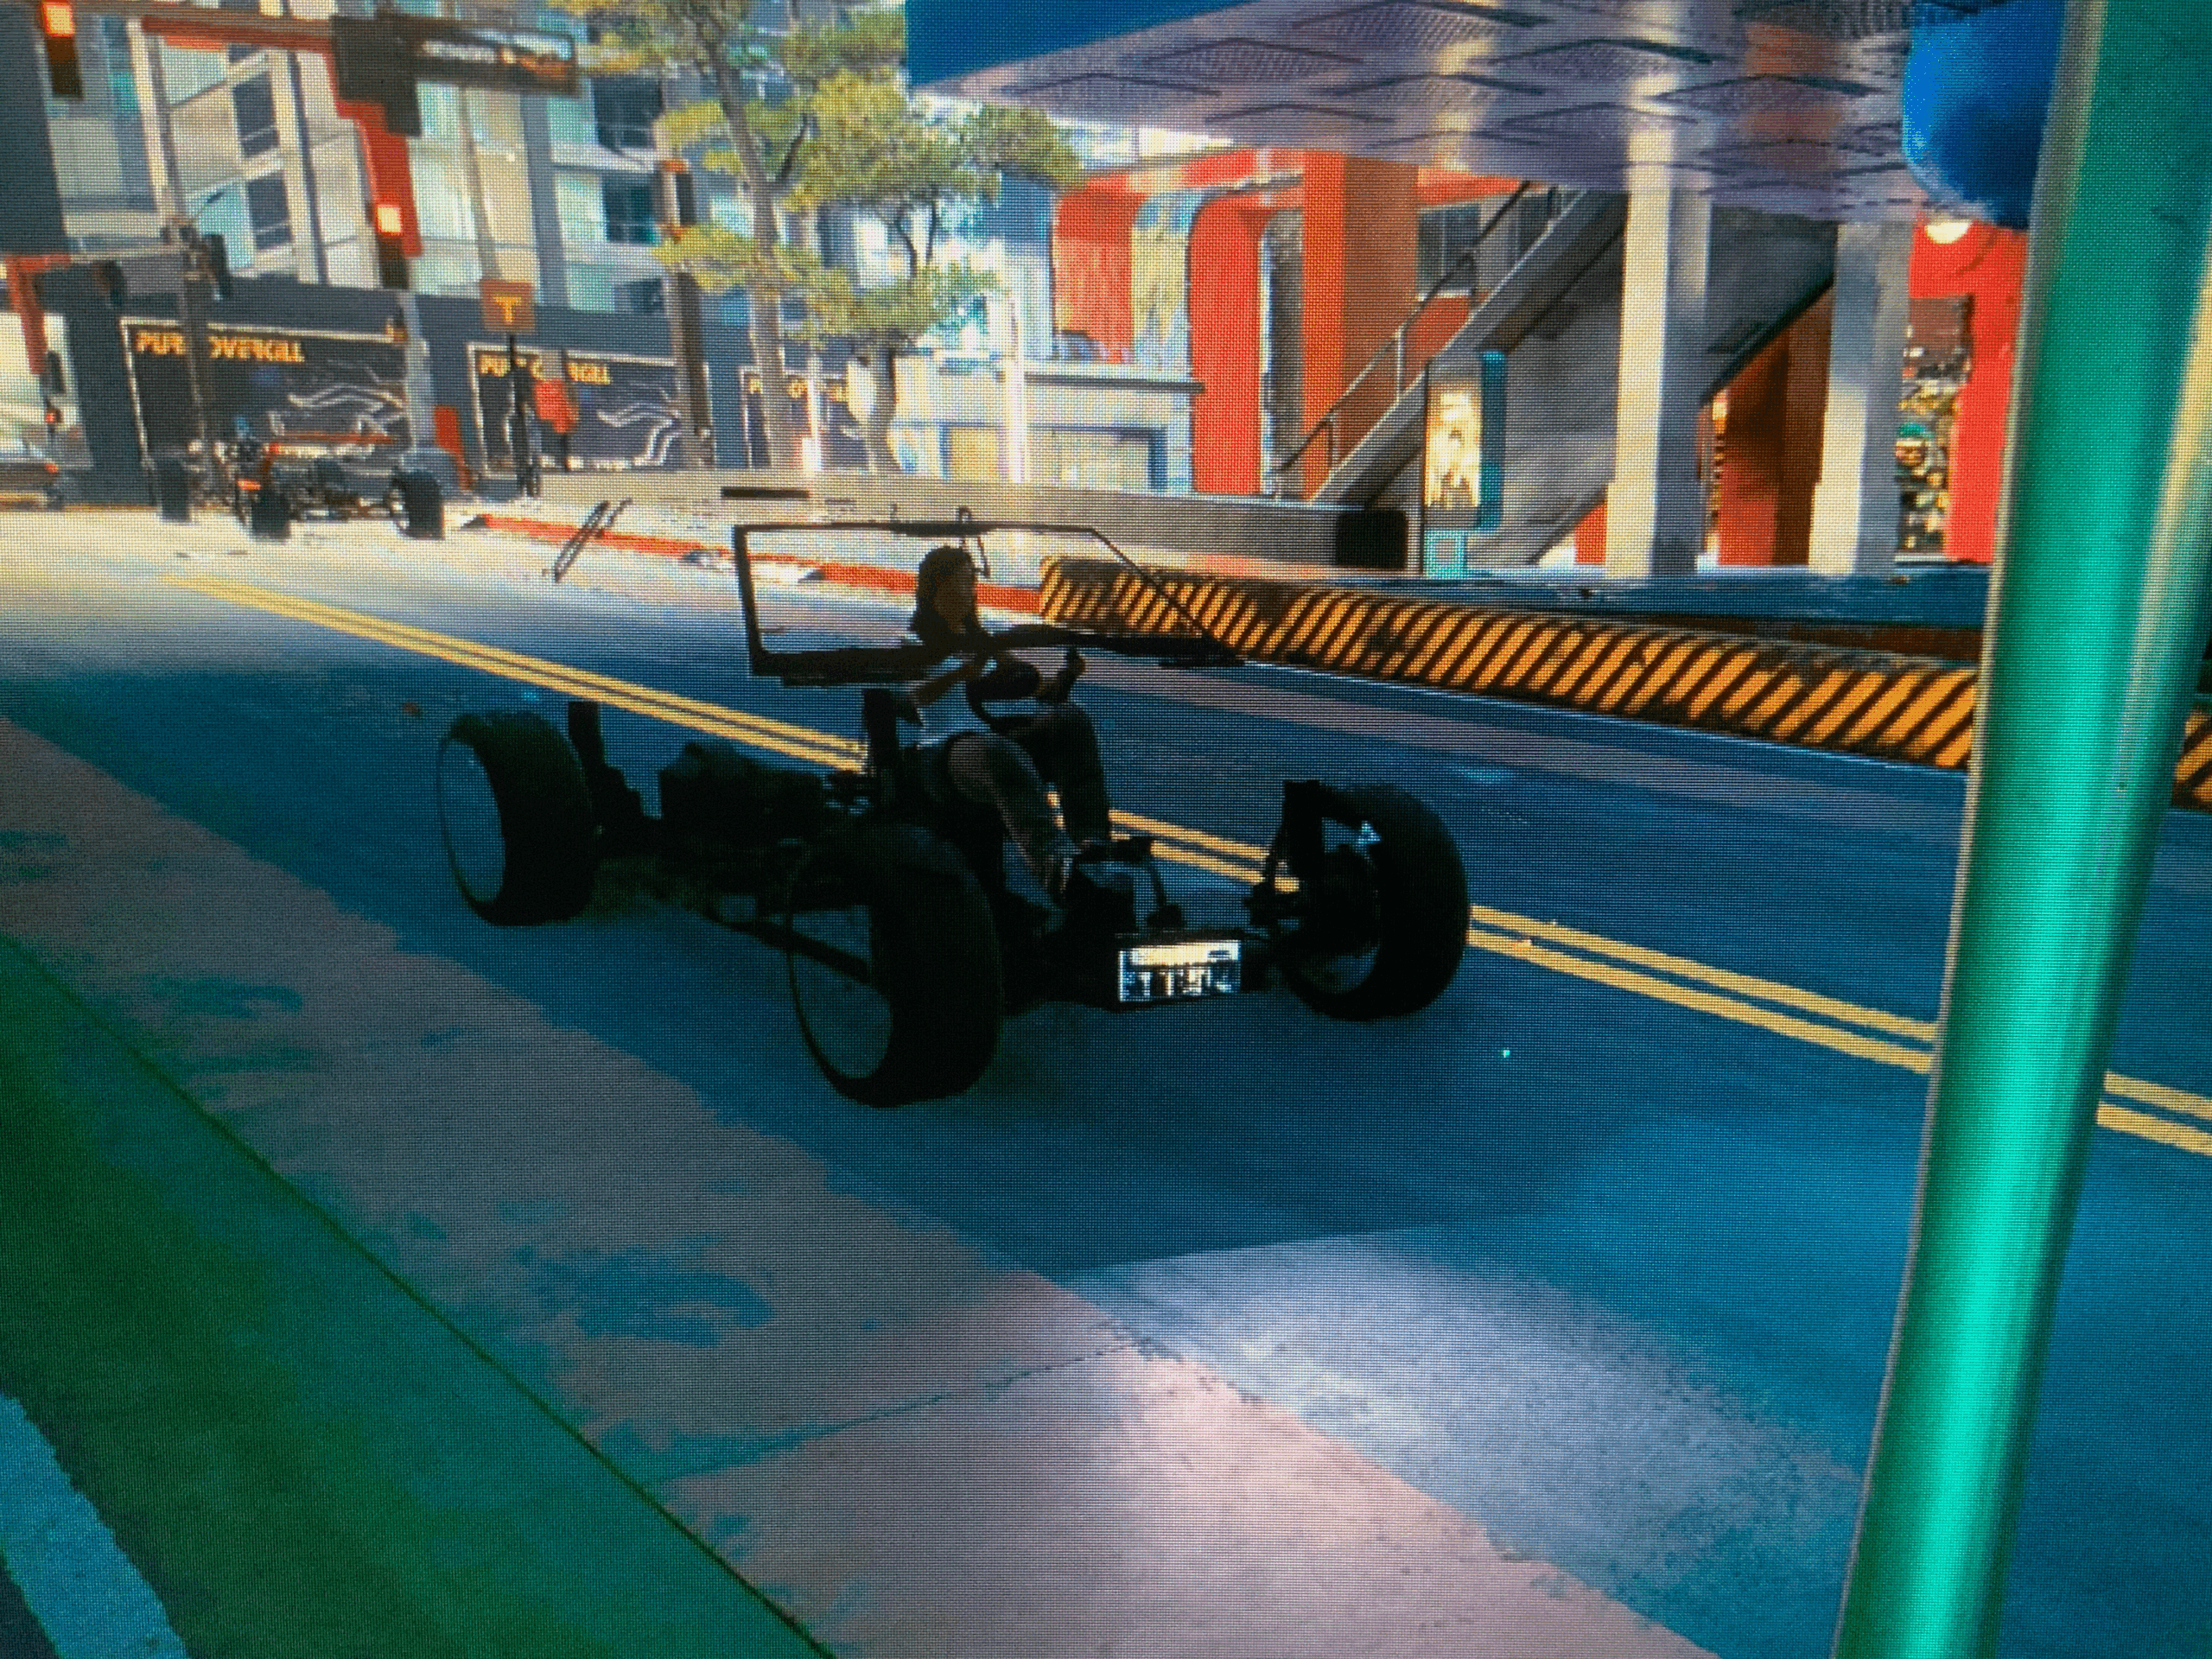
One quirk that went away quickly was a handful of cars driving by that were just the driver, a frame, and no textures over the body itself. I captures a screenshot of this, but seconds later all cars then subsequently were properly dressed in their panels.

30 minutes of gaming, crossing the city up to the Arasaka Waterfront yielded only an impressive result. The menus ran well, and disassembling components was far quicker than it had been in Windows. So far, with only two real changes to the configuration of Steam and the game I am very impressed.

I then installed Crysis 2 Remastered, an all-time favorite, to see how well the CRYENGINE works in Proton. As it happens, very well it seems. The game launched without any modifications, and the introduction ran fine. Only when doing the visor demo did the game crash, but it launched back up and I was able to play another 10 minutes without issue at a solid 60FPS.

Would I recommend doing this? Yes. If you have a gaming PC that you use only for games, try it with another drive and see how it works. Dual-boot is totally an option, and not a terrible one now that SSDs are ubiquitous and OS loading times are very short. Especially try this if you have a spare computer capable of doing it and in danger of falling out of support from Microsoft.

I remember back when USB-C was becoming a _real_ thing, with the EU getting fully onboard and setting dates for full compliance being required for every device manufacturer selling things there. This eventually forced Apple, albeit a few years earlier than required, to switch from the venerable Lightning connector to USB-C, which they had in fact been a part of developing.

In those days when the connector was not merely being used for data, but relied on now for power, a problem became apparent when cables sold online started being overwhelmed with current and failing, sometimes with significant consequences. This wasn’t like the Samsung Galaxy Note, where batteries were at fault, but poorly-engineered cables with insufficient gauge wires and insulation.

USB-A 2.0 connectors are pretty simple, with 4 contacts to do power, ground, and serial data. It had its limits for many things, both speed and power, because clocking higher can only get you so much more speed over copper and without shielding. Adding more connectors is the best way to do both things, and while Lightning could have done this more effectively, USB-C was set to push the envelope of what the most common connector in the world could do.

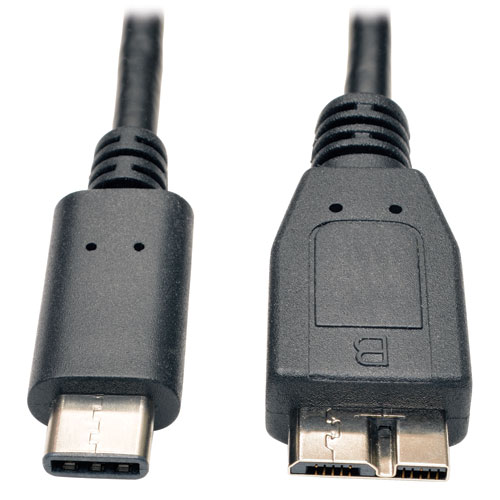
Do you remember the funny looking USB connector on some older portable hard drives and phones? Samsung used this on a few of the Galaxy devices and I pity the users who had to keep one of these ports clean and cables from being damaged, as it’s the most awkward one I can think of, more so than the USB-B port which you’re most familiar with on printers.

USB-C to USB 3.0 Micro-B cable

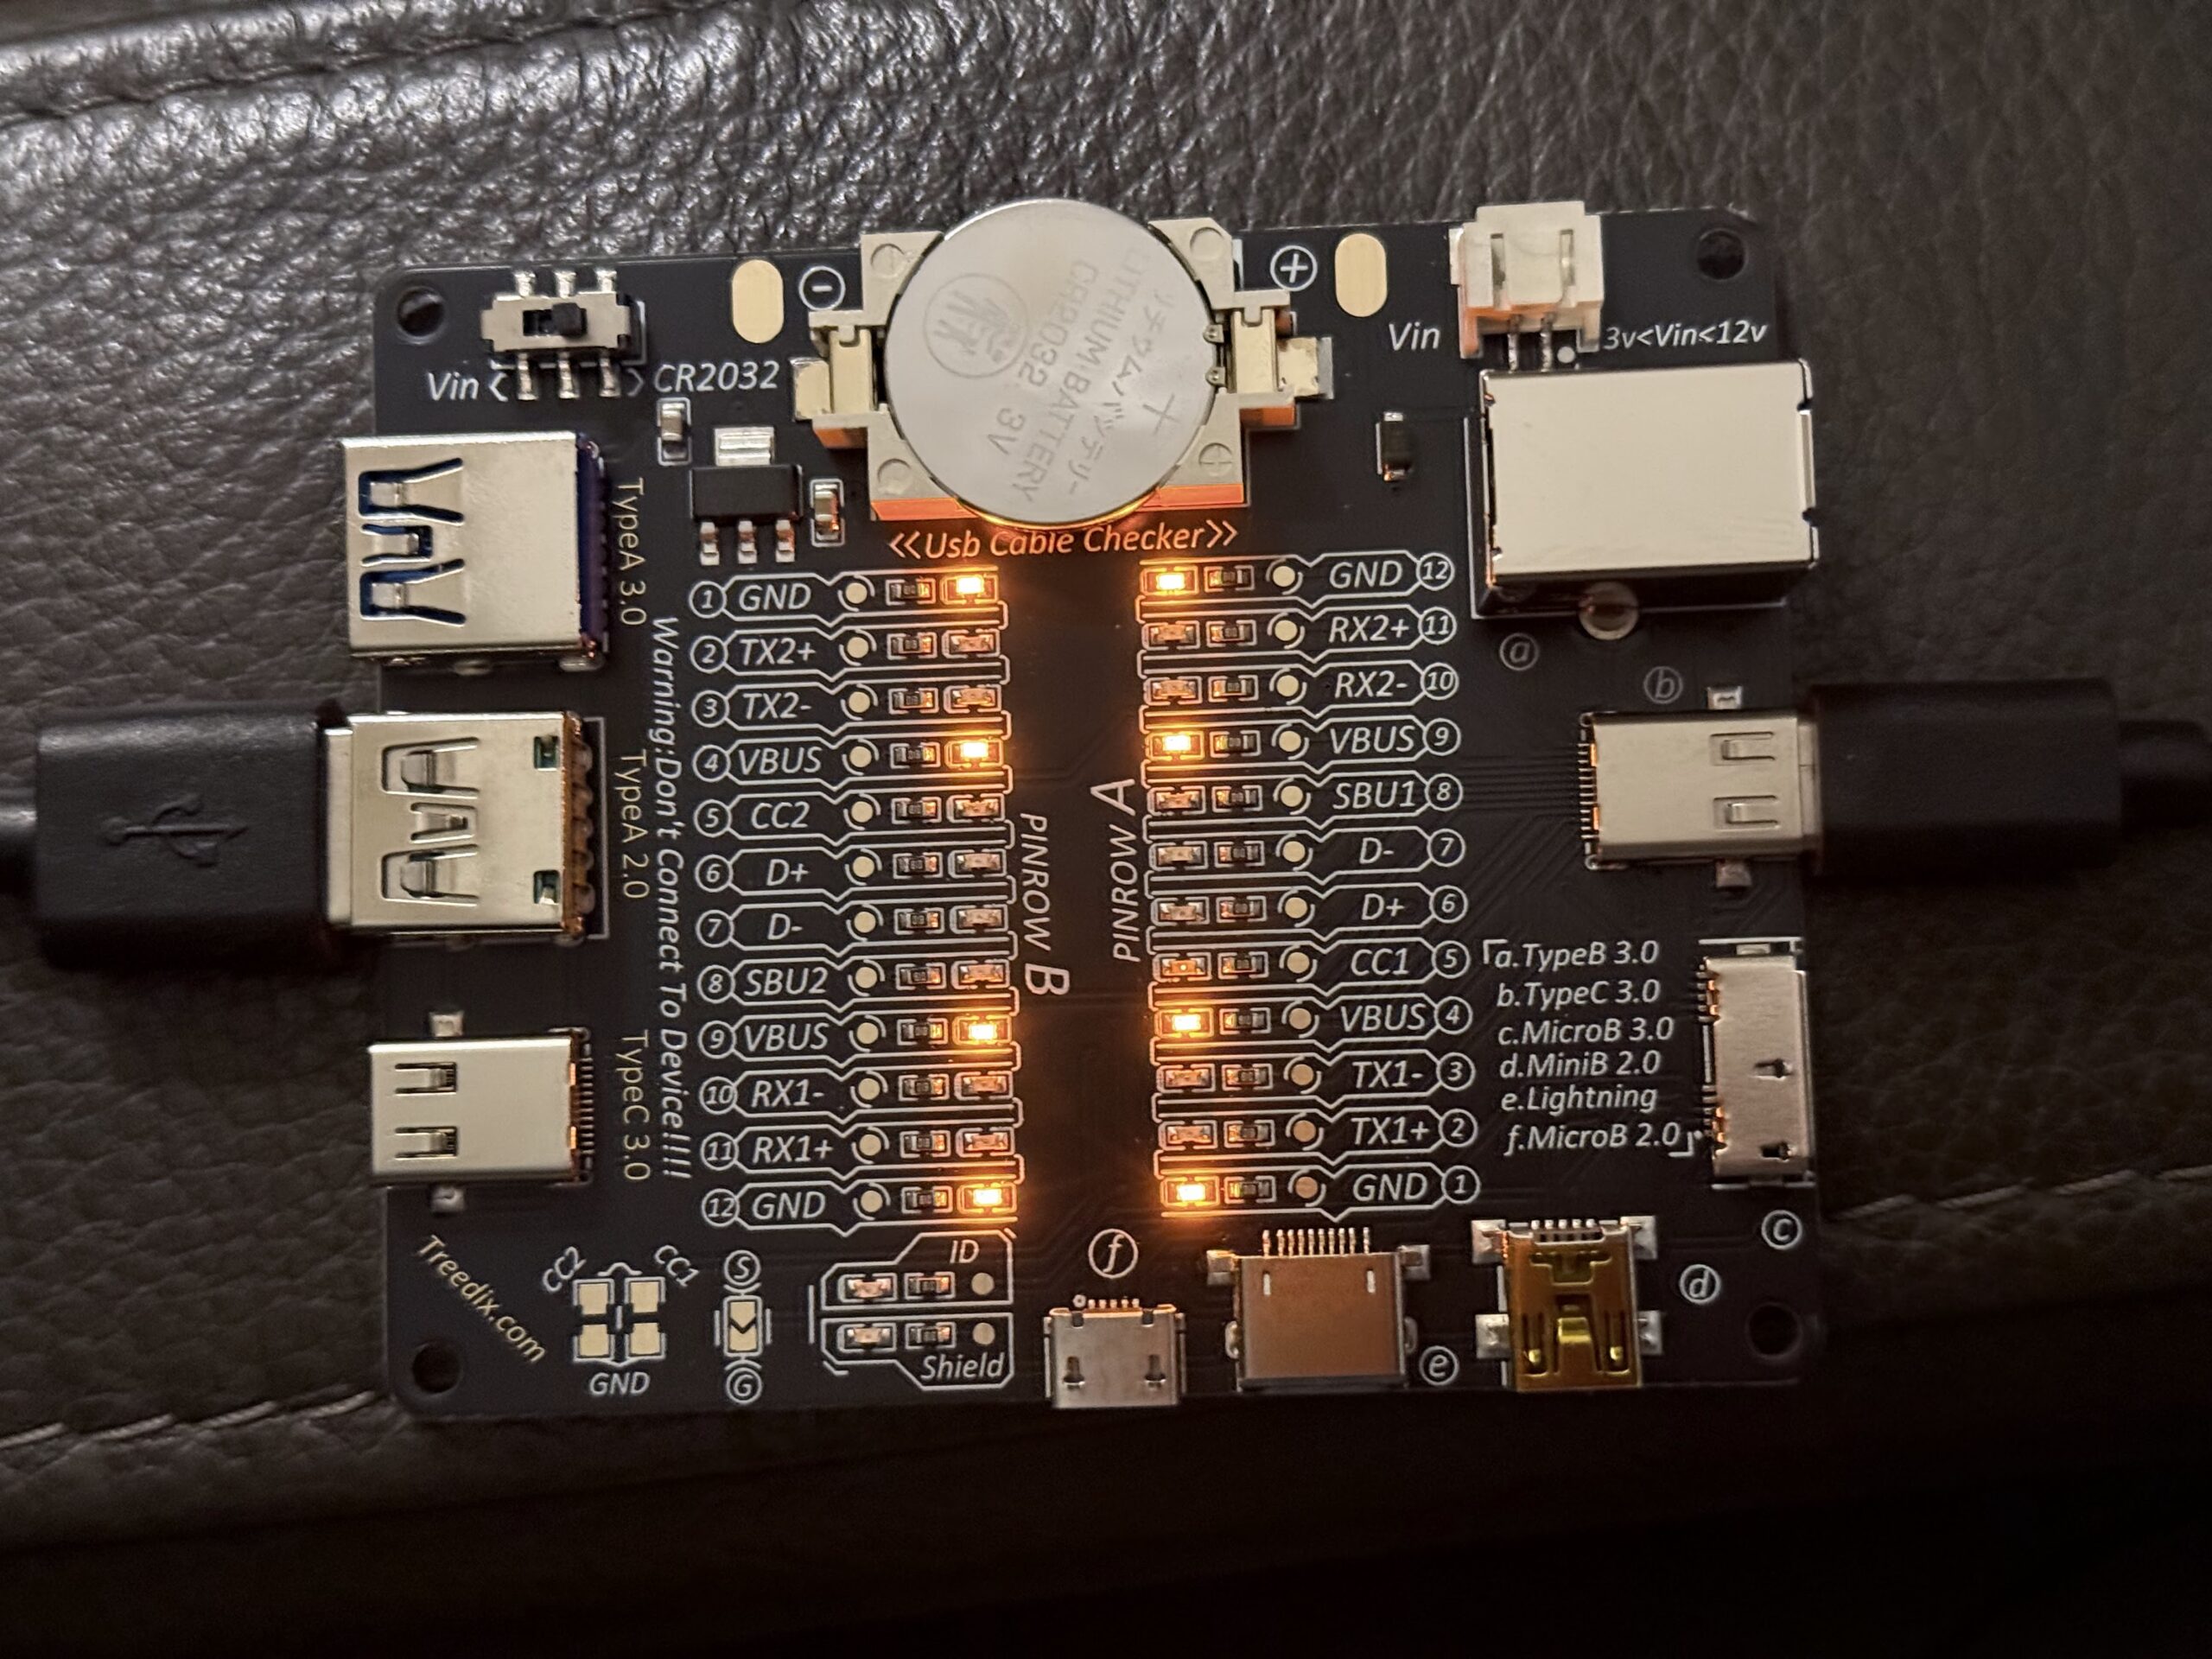
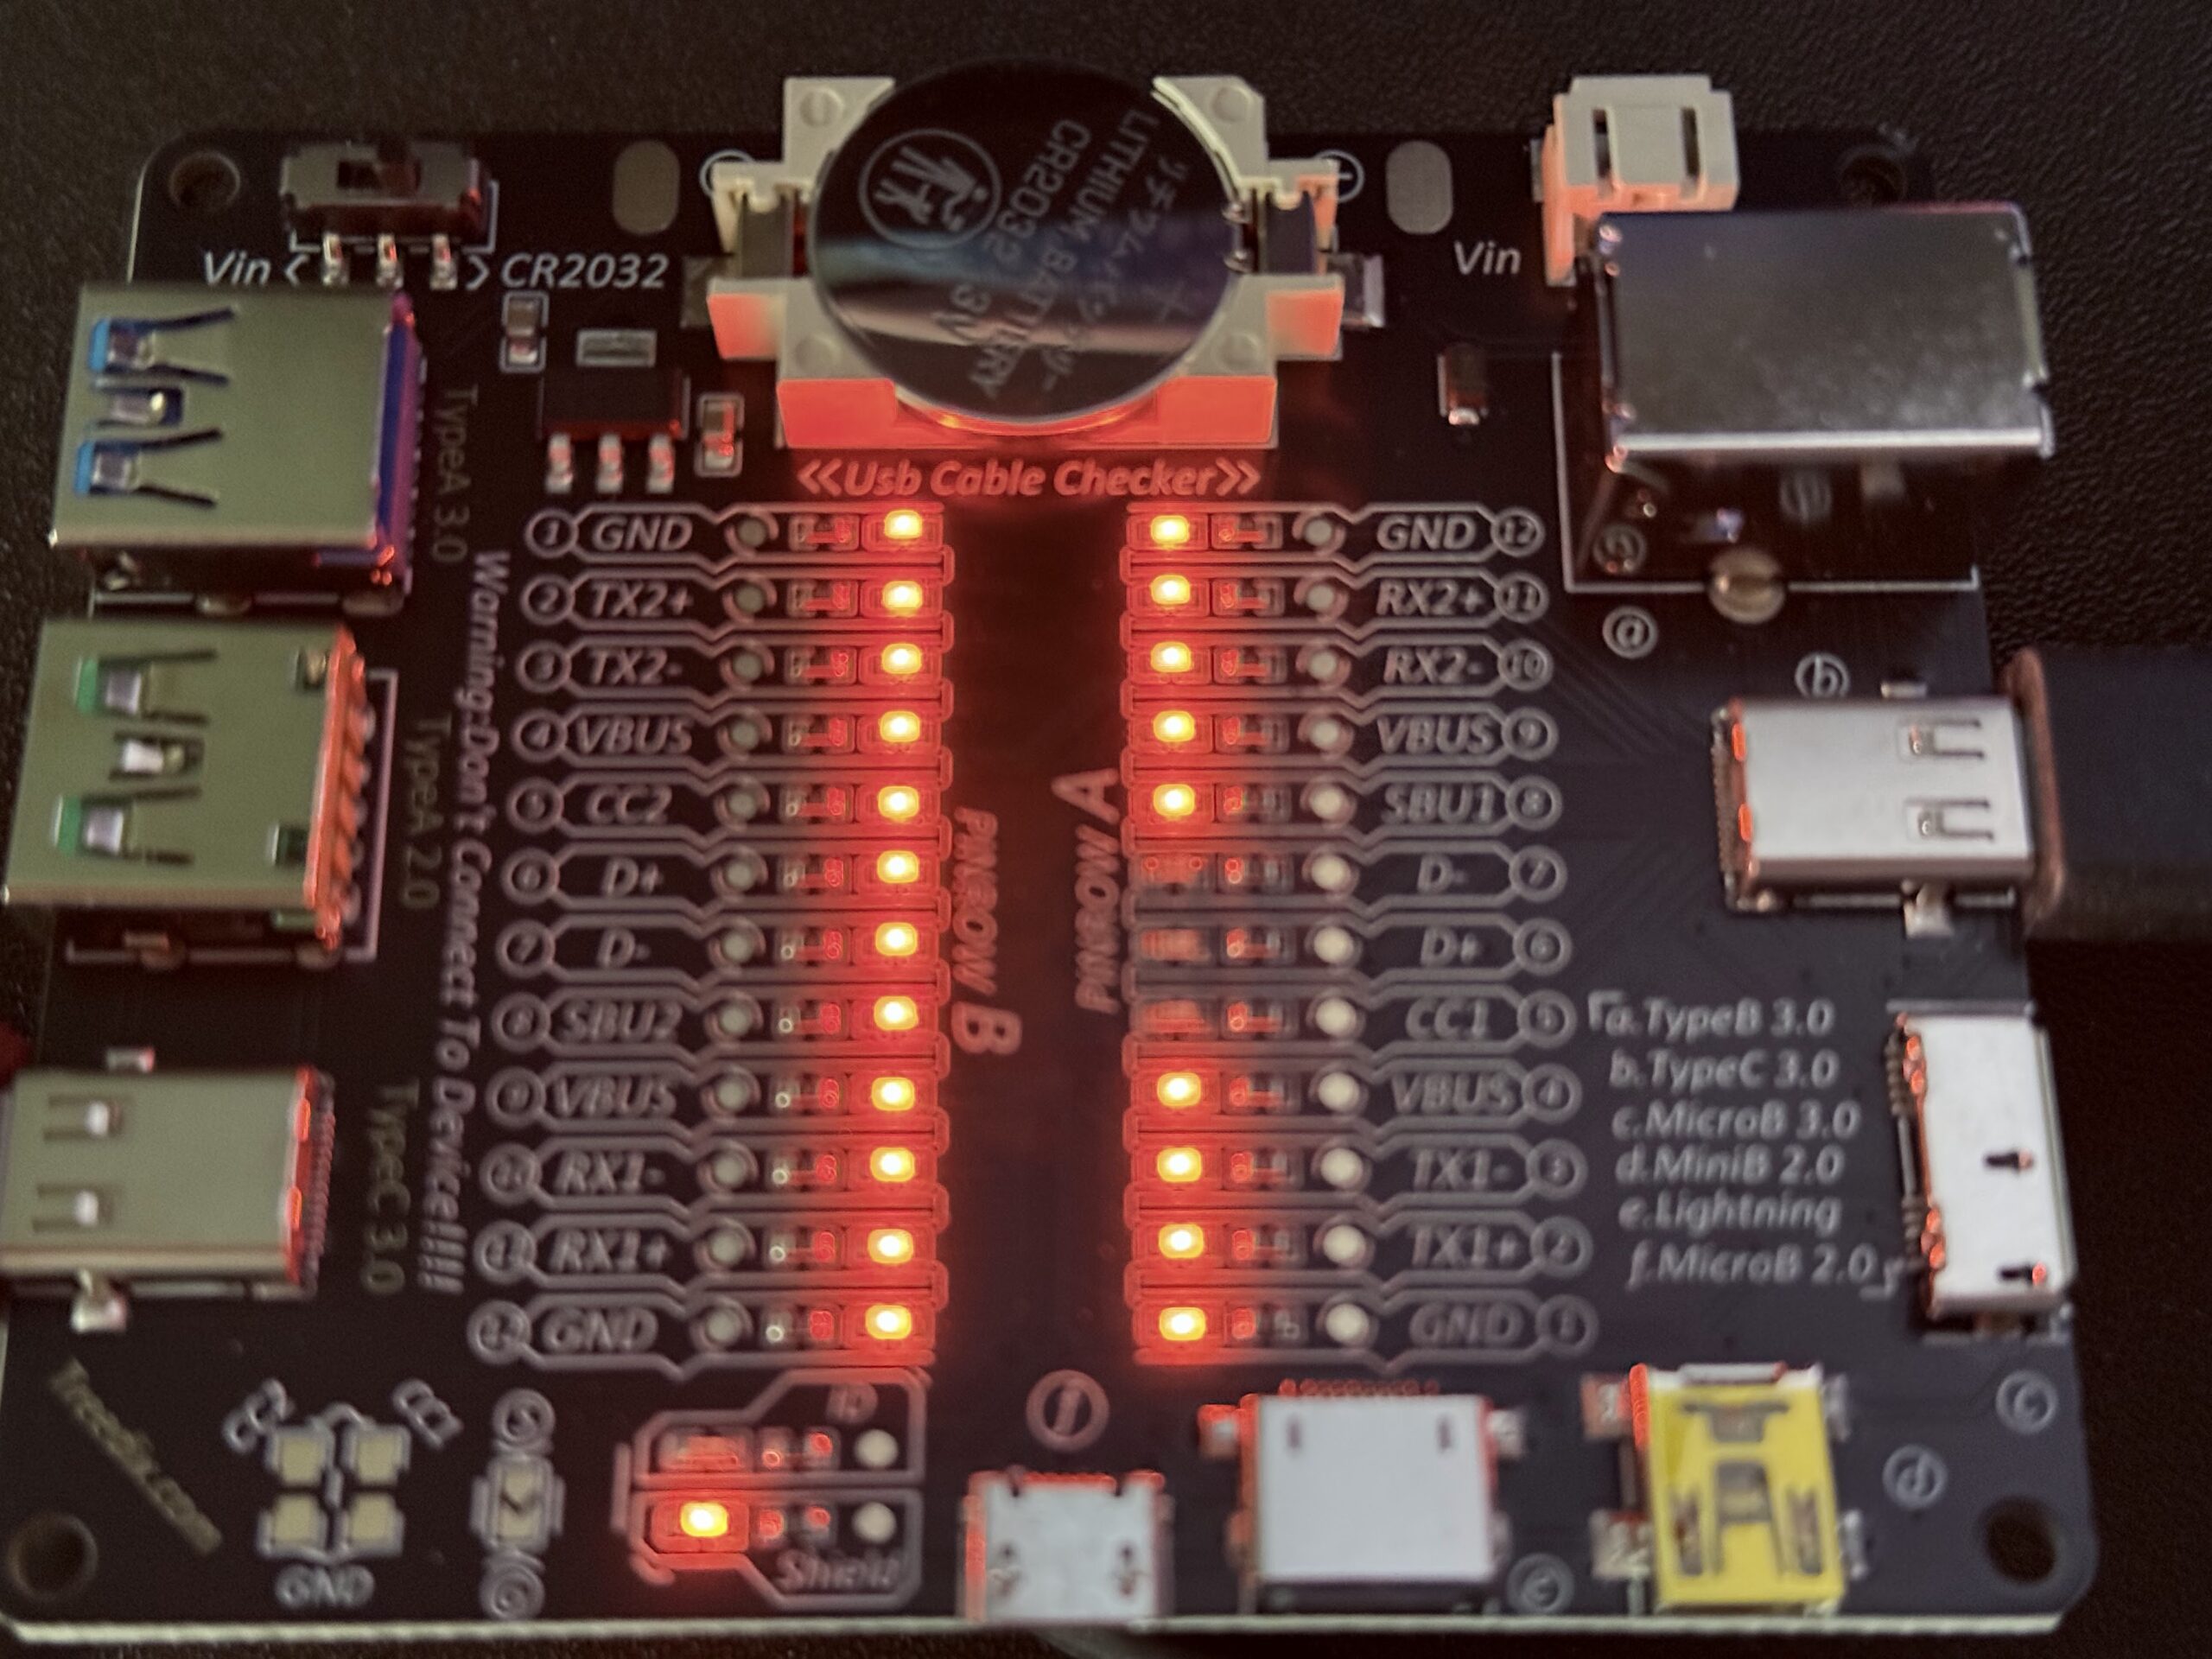
As you can see, that’s just adding more wires to the mix in a side car, but it was a real thing that had it’s use for a few years before bigger, better cables came along. More likely it was a manufacturing problem first, which is why you don’t hear about USB-C cables being an issue anymore. With the proliferation of the connector, better communication and negotiation of data and power became widespread. A more basic USB-C cable like an Apple 2m charging cord, is only USB 3.0 at best, but features more lanes for power. How do I know this? Let me show you.

All of these connectors are for power, except for D+ and D-, which are the basic USB data lines.

This neat board has USB connectors on two sides, with USB 2.0, 3.0 A ports and USB-C on the left, and a USB-B, -C, Micro-B, Micro, and Lightning on the right. It can also tell if there’s shielding present, which the Apple USB-C charging cable definitely has. I’ve not read deeply into the manual, but there’s also an ID LED, which may indicate some extra intelligence in a cable.

This neat little board is pretty cheap, runs from a CR2032, has a power switch, optional DC power in, and can give you a pretty good idea of how good, or bad, your cables are. Want to know if an A-to-C or A-to-micro is power only? Easy!

USB-A to -C power cable is only using the VBUS and GND wires, so it has no data

Power-only -C cables are very common, which is good, but can also be frustrating for those used to the -C connector being useful for power and data. The number of times that you’ll grab a short -C cable and plug it in to a device, to then have it charge but not mount, will be greater than zero. It’s pretty easy to test, and I think that my next tip will also be useful for those who hold a cable to examine what it might be able to do.

Those lights mean that there are at least 4, and maybe up to 8 actual wires present. This represents actual physical copper inside. If you think back to the Apple cable, then you begin to understand how many more wires are present. Even in that photo there are many, many LEDs not lit, but that’s not to say that you don’t own a cable that can light up most, if not all of them.

Do you have a USB 3.1 gen2 NVME SSD? Does it have one of those short cables that’s really, really stiff? There’s a reason why it’s 1) short, and 2) stiff. The first is that high clocks mean that the errors over a distance are more likely, so fast cables tend to not only be short for aesthetic reasons, but cost and complexity and reliability all factor in. This cable is from a RAVPOWER 1TB NVME SSD and it almost gets the full tree. It’s short, less than 12″, and really resists being bent.

USB-C cable included with a USB 3.1 NVME SSD

It was tricky to get the cable to bend all the way from one side of the board to the other, but I was able to make it work. It’s shielded, and using all of those other side channels in the RX- and TX- but not both of the D- D+ and the other CC line.

You can find this little widget on most any online marketplace or go to https://treedix.com and order direct. I bought this one through an eBay seller, and did not go for the optional polycarbonate case.

I have a few m.2 SATA Samsung drives that I needed to securely erase. It’s a tricky thing to do, surprisingly, especially when you’d prefer to not do a long pass in the manner that you would with hard drives.

For those unaware, Samsung has a built-in tool with the Magician software to create a USB boot disk to securely erase an SSD. With a 2.5” drive, where the SATA and power are separate, dealing with a “frozen” drive involves starting the utility, selecting the drive, unplugging the power lead from the drive, powering it again, and then proceeding with the quick, secure erase.

When the drive has an edge connector like an m.2 slot, this isn’t possible. In the course of trying to replicate this process I tried many things, including other computers. None of this effort was successful, however, and I needed a hybrid approach.

It occurred to me that someone must make an adapter that would make it possible to connect an m.2 SATA drive to a standard SATA port. There are reasons for doing this, though I’d have a hard time coming up with many, but I’m glad that such a thing exists. It’s cheap, and worth having around for not only tasks like this, but as a neat tool to keep on the shelf just in case.

A brand called ELUTENG makes this:

It’s SATA III and can adapt to all four of the m.2 module lengths, from 30- to 80-mm. The drive slides right in and the included hardware and screwdriver can fix a drive in place if wanted.

So, I picked one up, and it does the trick just fine, making an m.2 into a 2.5″ analogue and letting me securely erase these drives using the Samsung utility. It’s brutally utilitarian, and that’s exactly what the task needed. It might also be useful for use in an SATA-only system at some point, and with m.2 SATA ports being a little more unusual, that might be a thing in the future.

For those curious, this was using an older NUC, where I was able to disconnect the power from the motherboard using the cable connector below:

For the full details and part number for this item, which I did not receive for free, see below

I was a vehement believer in the “Internet of Shit” as devices with wireless capabilities were sweeping into the home. It seemed like, and is, a bad idea to just add whatever crap device to your wireless network in the hopes that it will do a trivial thing. This goes from lightbulbs to water shutoff valves, and everything in-between.

That changed a few years ago, and I’ve come around to using _some_ IoT devices in the home. The current extent of this is lights and power switches. Nothing crazy. What I’d like to go over is what, how, why, and who. The start was simple, and then sped up, then got fun. It went from one vendor to four, but all work within one system, which is the most important part of the whole arrangement. I chose to have one master system that would control everything, and it is not HomeAssistant.

I stand by the statement that Apple’s stance on device security, and security in general, is a result of their not being able to do literally anything on the web. This was an important pivot, and it’s why I eventually came to respect Apple for a few reasons. There are issues with the company’s polices, but they hold the line in most cases, and bend to good policy when they’re wrong. It was only when Apple really got their HomeKit system solidly in place did I figure I’d try some home automation and devices.

The biggest reason I went with Home. is that the core principle of the system is that it can work without talking outside of the network. No secondary apps should be necessary to add and use the core functionality of a device. A lightbulb, wall switch, camera, or any other device can be added and configured without downloading an app from the manufacturer. This requirement means that fewer Apple Home devices are out there than Alexa or Google, but it also means that when those device manufacturers abandon them, or disappear completely, the devices are still useful.

Because of this standalone model, you must have a device that manages everything. Until recently, it was possible to do this with one of three device types. An iPhone can not be a hub, but an iPad, HomePod, or AppleTV 3rd generation or newer can be. I had an iPad available, so I used it for the task to figure out whether or not IoT was something I wanted to keep using.

I started with some WeMo smart plugs. They are cheap and easy to get, and are frequently found used for half their normal retail cost of $30. An update to their firmware meant that they could be used with Apple Home, if they were an early version, but with some complications that I may get in to. These did require some fiddling, and getting the WeMo app, but that wasn’t something I felt uncomfortable doing as the brand is one of Belkin’s, and they’re known very well in the industry for making good products and being forward thinking.

Once I went through the laborious process of adding the switches to Home, which was complicated because these older WeMo devices didn’t have the QR code on them, I got to making automations that would do simple things, like turn on two lamps in the living room at 45 minutes before sunset and turn off at night. It was something that Apple had baked into the Home app, and it was just a few changes and selections that made it work. This was all fun and good, and I eventually aded 5 of these switches, plus one bonus from another brand, which are still present in the house doing normal things, but interestingly they don’t need to turn on lights anymore.

I don’t remember when I got the first HomePod mini, but I figured that the newish device would be a good replacement for using the iPad, and I wanted to add a speaker to the home for simple functionality. I added it to the kitchen area, then added another to the bedroom, and a third to a basement area. I found it fun to cluster these together and play music throughout the house, but it’s a feature that a person will likely do once and never again…but they can. HomePod being a hub is a good thing, because the devices get OS updates and features get added behind the scenes, all managed in the Home app’s settings.

Lights may have come next, when I looked and found some LIFX bulbs to try. Home compatibility was a must, and they came with little cards to scan to easily add them to Home. I put these in the bedroom area to free up one of the switches and then realized that I could ask Siri to change the brightness of the bulbs. It honestly hadn’t occurred to me previously because the lights were controlled by switches, not the bulb itself. I changed a few scenes so that when the bedroom lights went on they weren’t at full brightness, but perhaps %60-70.

A big change came when a local decided that they’d had enough of their Hue system. A hub and what ended up being over 20 bulbs was mine for a price that I could not turn down. This did introduce another app to the mix, but I was again confident that Philips, one of the largest electronics manufacturers in the world, would do me right. The difference between the LIFX bulbs and the Hue bulbs is that Philips uses a hub, which connects to the network, and is a bridge between the two systems. The core change is that bulbs communicate over a different network, not using the normal wireless channels, meaning that network congestion isn’t an issue. The person I got the system from found out very quickly that 20+ bulbs using their home wireless was a problem. But it wasn’t mine.

The Hue app is pretty good, and I was able to very quickly and easily set up rooms and get them added to Home. This changed the game throughout the house, from the porch to a closet under the stairs. Sure, I now leave all of these light switches on and there’s more power usage, but the Hue bulbs use a minuscule amount of power per light. These bulbs were only the normal sized, normal temperature, with no colors or any other fancy features. On, off, and level. That was all easy to configure and set up first in the Hue app, but then fine tune in the Home app. Once again I would set up things in an app, but then could leave it closed for months at a time.

Later on I decided to add some first-generation HomePods to the system, for their use simply as audio in the living room. They were supremely over built in many ways, and very serviceable if they failed, but also very easy to find used at reasonable prices. Amusingly the first two that I was able to get were the white, then black, so I have a salt and pepper set. I kept meaning to get another white one, but I’ve kinda settled into the set I have. I was able to easily pair them together for AirPlay from phones, tablets, and computers. It’s something that I use many times a week, and sometimes per day.

With one of the HomePods I got an iDevices switch with an integrated light, which has been kind of fun to use. It also helped to get its app, as the very early ones like WeMo didn’t have the QR code for setup. I now use it as part of the hifi system for my amplifier, and it does a great job.

While at a local reseller of items I got an LED strip, which was really very fun to set up and use. Two meters of RGB lights in Home is pretty simple, and I know it can do more fun things in the manufacturer’s app, but I really only need it’s more basic functions. Colors and brightness are the core uses for me, but I did have some more fun when another batch of devices came along later.

A very good friend was moving from a Philips system to other pastures and offered me a very valuable trove of items to spruce up the home. Four RGB bulbs, two of the ambient bulbs, two wall switches, a multi switch, and another LED strip were shipped to me. I had a bit of thought and put these in the most used placed, where I’m at either daily or weekly, and where a different color or tone or hue would be a good thing. The living room once again got its bulbs switched out, and now it can be very interesting in there. Same with the bedroom, and the studio. That’s where the second LED strip went, and it makes a fun accent to the vibe I’ve created.

One of the reasons for using the Hue app outside of the Home experience is that it offers several dynamic scene options for RGB. For example, I have the LED strip in the studio set to emulate a fireplace, so it’s very red, with yellow and orange flickering. I can also have a similar effect with the other RGB or ambient, temperature-changing bulbs. It really did add spice to some rooms.

So, what’s next? I’m not sure. I’ve only just recently mounted those two wall switches. They have on, off, and two dimming buttons. We decided on locations to put them and this has brought down the calls to Siri a bit, but that’s fine. Sometimes a manual switch is just easier and more reliable than a speaker either hearing or comprehending what you’re asking. It seems like it’s come around full circle, but sometimes that’s the process.

At this point I’m satisfied with what we have set up. I think that more accent lights, such as the ones from Nanoleaf, would be fun to add in the office space. I’ve avoided things like in-wall switches because this house has very thick copper wiring and my delves into the walls previously have led to a lot of sore fingers and cursing. Add to that the complete mystery of how the breaker box is zoned, and, well, remotes it is.

There are few things that I’d change, but the biggest is that Home was able to incorporate some of the more niche features of something like the light strip and bulb’s RGB color scenes, like the fireplace. I understand why they don’t, because those are vendor-specific, but I’m hoping that one day Home will add such things. We’ll see what happens.
This isn’t going to be a purely tech-focused entry, but the first part of what’s likely to be a series. It’s more of an out-loud guide for myself and possibly for the benefit of others.

I’m one of very few people I know of whose spouse and I both had living parents, still married, at the start of 2024. The other is a sibling, or was in this case, as 2024 was a tough year for parents in the family. It’s not that we didn’t see this coming, because it is mortality in the simplest terms, but two of these losses were brutal. Needless to say that, in early 2025, that first statement can no longer be said.

For my brother’s family I was able to rescue data from a mobile phone and PC, then transfer multiple Video 8 tapes to a digital video format and share them more broadly. This is something that I enjoy doing, because a tape is a great place for a backup, not the original copy. Those videos and photos and files are shared and accessible to the family, while the digital devices have been sanitized and moved on to new owners.

For my spouse’s family’s needs, it was a little bit easier as the change and passing wasn’t as fast. We were able to, as a family, make decisions and get the proper settings changed in order to make sure that data and access was not lost. This side of the family uses iOS and macOS exclusively, and those platforms along with iCloud have features like Legacy Contacts that enable access to data if there’s ever an occasion that immediate access is lost. This was easy, and included two of the siblings in the family. We also did something similar with the Google account they used, to ensure that access to the iCloud’s email address was secure. This is important because so many necessary services like internet, banking, utilities, and other household needs are attached to email addresses and phone numbers.

2FA is a good, or great thing, but boy can it be tricky when you want to do simple things sometimes. For example. I was trying to enable a feature in iOS but there was an old iPad mini on the account. This device was using iOS 12, which didn’t support the feature, so it had to be removed from the iCloud account before it could be enabled, which is a bit strange, but understandable. However, when I tried to remove this device, I was unable to use the passcode. After several tries I had to add my face to the device and only then was I successful. Very odd, and possibly controversial, but for other reasons that I won’t go into here.

With all of this set up, we also decided to change the phone passcode. It had been left in the hospital with the person, and family members, but there was an incident where data was removed from the phone. Yes, it was a conversation with another family member, and all data was removed from the conversation. I consider this a violation of trust, as only one side of the conversation is truly private. This prompted us to change the phone’s passcode and not share it, which then caused some controversy. Be prepared for this, but also have just cause.

Along the same lines we did change the password for the computer in the house, which only had a password to keep younger grandchildren from installing programs on it unattended. I can’t say that this has had any controversy related to it, but suffice it to say that the sole person whose issue it was with this can probably assume that one step was too far.

The next steps have been slower and more deliberate. We now have the Apple and Google and internet provider’s logins and passwords saved on the legacy device and that of the still living spouse. As of iOS 18 and macOS 15 there’s a new Passwords app available. It’s very good at the 90th percentile of what any user would need in one app, and we’re putting this to use by making sure that the login data is stored on iCloud and is now shared between accounts and with other family members. One interesting feature I found only last night is that you can set up a passkey in a shared folder on another account. Neat.

I highly recommend using Passwords, even if you’re used to LastPass, 1Password, or other apps. I’ve been very satisfied with the transparency it’s enabled, especially in regards to what was a massive number of wireless access networks I’d connected to in the last 15 years. I must have deleted over 100 networks that I’d long forgotten about. This is wise because there are MITM attacks using devices like the WiFi Pineapple that can be very harmful with these devices and their willingness to connect to anything that looks familiar.

The Passwords sharing feature is something that we’re just starting to use. It does encourage Family Sharing, where you can share passwords with all members of the Shared iCloud storage. We opted to not do this, but to be more specific with the iCloud users and passwords to share. So far it’s working well, and we’ll be making changes to which passwords are shared and the accounts that have access to them. I quite frankly feel much better about using this as a method of password sharing versus a standalone app because many companies you know of also have been in the news for the wrong reasons. Share wisely.

Part two is likely going to deal with what you do when a family member passes and you want to maintain their accounts and communication, but their spouse isn’t even as technical as they are. It’s going to be interesting.