Where it started
My journey to the current project starts pretty far back, in relative terms, and with a simple setup. I had been using a 24″ iMac as my primary computer, running Windows with BootCamp, and wanted a place to store media for use on the LAN or available elsewhere through OpenVPN or a service you may remember, Splashtop. This system was a quartet of 1.5TB Seagate drives on an Intel DP55WB board with an i5-750, some RAM, and a boot disk. It ran Windows well, and the disks were set up in the BIOS as a RAID5 array, something Intel used to include on workstation boards like that. It was good. It was also overkill, big, a little too noisy, and I wanted something smaller.
My supervisor at the time was looking into a dedicated NAS and we both arrived at the QNAP brand nearly simultaneously. I went with the TS-459Pro-II and he got something similar. It was a two-core Atom CPU with four bays and expandable RAM. Decent web interface, dual LAN adapters, and it was quiet/cool. This was in early 2012, and disks were hard to get due to a severe flood season in Thailand, where many companies were building them. I was able to get four Samsung Spinpoint disks, 2TB each, and assembled everything. It’s been a solid system for streaming, file storage, and some occasional remote use with OpenVPN. I am still using it right now because it’s low-impact and QNAP keeps releasing maintenance firmware updates.

To replace the QNAP, for storage capacity reasons, I looked around for options. A used QNAP four-bay was almost always available locally, but reading reviews of the newer hardware gave me pause. Mentions of backplane failures and other issues kept me from picking up something second-hand. It didn’t help that sellers seemed to think that these 5-10 year old appliances were worth so much. Patience paid off, however, and that convergent interest also came about again with my now colleague.
We both still had our QNAP units running, and he’d also done a rackmount setup also, but was really looking to retire some old, hot, power-hungry enterprise server hardware and consolidate if possible. I’d just joined the UT Home Labs Discord server and seen how much people were talking about NASes, so got a bit enthusiastic about a BYO solution instead of something purpose-built. We settled on unRAID, a solid piece of software that has a generous trial period, and reasonable prices for a lifetime license. I was able to get it set up and use Docker for the first time, finding a bit of a new world in features that a NAS platform could offer.
The hardware for this NAS came from a used U-NAS NSC-400 four-bay unit, which the previous owner sold with power supply, motherboard, CPU, and RAM. It is a Haswell Core i3-4330T, 8GB of RAM, and four HGST BLE 4TB disks. The setup was easy, it runs quieter than the QNAP, and the performance was also a good step up. I run Deluge, pi-hole, Crusader, and a few more Docker instances on it with ease. Barring some puzzling issues with SMB speed on macOS, it’s been very good and worth the 12-disk license cost for future expansion.

I was able to consolidate many volumes of data, with an unspeakable number of duplicates, into this four-disk array, but I found that even with a doubling in capacity I was uncomfortably close to the nearly 12TB size of the array. What then? Add some 8TB disks one at a time and expand the array? I didn’t like that idea because it was committing to base hardware that was already a bit old. What I needed to do was make this a stepping stone to the next long-term solution.
Where it’s going
My first searches for NAS enclosures did surface SilverStone as an option, but what cemented them is a friend’s experience building something similar. He’d chosen the CS series, with an all-in-one AMD-based motherboard sporting 12 SATA ports onboard, with two disk pools for workspace and cold storage. I found it clever, and kept it in mind. Later, finding the DS case design more to my taste, I then naturally kept a DS380B in my eBay watchlist for…a while. Some more research led me to finding that the ASROCK AMD board combo he’d used was, well, more pricey than I was willing to spend.
So, for the third time now my colleague and I were doing something very similar. His initial experiences with unRAID were good, but then fraught with issues when he subsequently tried to add disks, then swap in a RAID/HBA controller, then a new motherboard, etc. He learned a lot, and finally settled on an Intel i9 that became available, 12-disk case, 16-port card, and even a GPU for some Steam gaming in a VM.
The turning point is when I was able to then acquire a mini-ITX ASUS PRIME H310I-PLUS motherboard with an Intel I7-8700 CPU (Coffee Lake 14nm), 8GB RAM (DDR4 2400), and the wheels started turning. The board has a single PCIE slot, but does have a rear-mounted m.2 slot for SATA/NVME disks, and plenty of RAM capacity. Four SATA3 ports, USB3, and a focus on reliability over performance. As of this writing I am going to stick with the DDR4-2400 RAM, but will likely up the game soon to at least 16GB of 2666Mhz.
The hardware
So, here’s how it’s panning out. I did settle on the SilverStone DS380B. This case offers eight 3.5″ externally accessible drive bays, with rails, that can accommodate SATA and SAS disks due to using an integrated backplane. More on that later. There’s additional space behind the vertical drive cage for 4 2.5″ disks, which is a good place to put some laptop or SSD disks to use as cache or scratch space. They’re out of the way of airflow and cables, so it’s a neat way to get 12 total disks in, or more if your motherboard has interfaces like this ASUS does.
https://www.silverstonetek.com/en/product/info/computer-chassis/DS380/
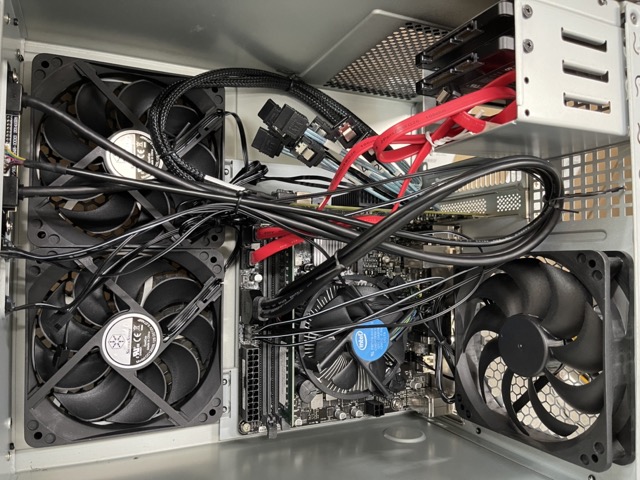
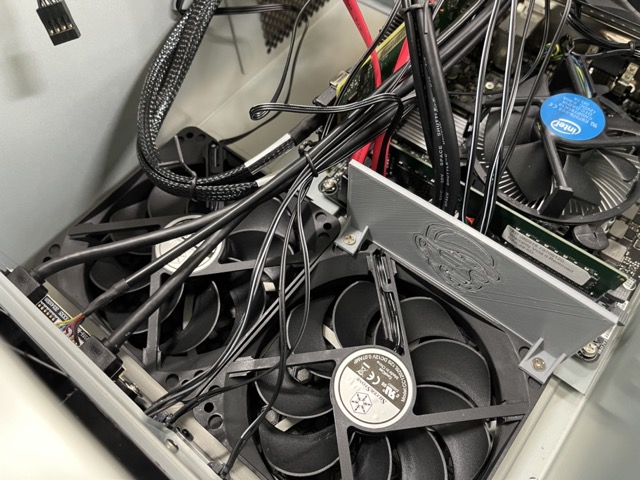
Setting up the motherboard was simple, as mini-ITX is just four screws. The DS380 drive cages come out easily with a few screws and give unfettered access to the interior. Connecting power, front panel connectors, and fan headers is trivial. I’d asked the UT Home Labs for some advice and was pointed enthusiastically towards the LSI 9207-8i for my disk controller needs. It has two miniSAS connectors for use with up to eight drives, is very affordable at around $30USD, and seems to just work, which I’m all-in on. The case does require a specially adapted cable for use with a card, however, so look into the SilverStone CPS03 cable and make sure you order two. They’re cheap. The HBA card does have some minor clearance issues, so installing it with the full-height bracket does mean that either the DS380’s graphics card support fixture on the drive cage needs to be trimmed, or simply removed entirely. Five screws later the clearance wasn’t a problem.
https://www.tweaktown.com/reviews/4882/lsi_9207_8i_mustang_raid_controller_host_bus_adapter_review/index.htmlGetting the system up and running was a little tricky. The onboard SSD still had Windows 10 installed on it, so I was pleased to see it boot successfully on start. I was a little puzzled that the SAS card BIOS didn’t show up on boot, nor did the disks in Windows’ Drive Management. The “Mustang” LSI controller did show up under Storage Controllers, so at least I was confident that it wasn’t a card issue. Some poking around and help from a UT Home Labs admin got the SAS BIOS loading, but disks were not showing up. The trick to getting the card BIOS to show was enabling CSM compatibility in the motherboard’s BIOS instead of insisting on UEFI only. This was a very important step, so if you’re finding that your HBA/SAS card BIOS isn’t displaying before the motherboard’s logo, check for it.
We then connected an SSD to one of the SATA connectors coming from the LSI controller, to test and make sure that the card and cable, which is special to these cases (CPS03), functioned as hoped. The drive showed up on a refresh, so we were confident that things were okay. Some more digging found that the reason was likely some misunderstanding of the backplane ports. The DS380B and other SilverStone products in this range have a fully-integrated backplane PCB set up with one or two Molex power inputs, SATA/SAS compatible drive slots, fan headers, and interface two ports for each drive bay. One is labeled SAS, while the other is SATA, numbered 0-7. I’d naturally plugged the CPS03 SATA-connector type cables into the labeled SAS ports, but this wasn’t proper procedure. It’s apparently possible to use fewer than eight ports from the card with 8 disks through the use of the labeled SAS ports, somehow using the topology of the backplane and SATA cables as jumpers.
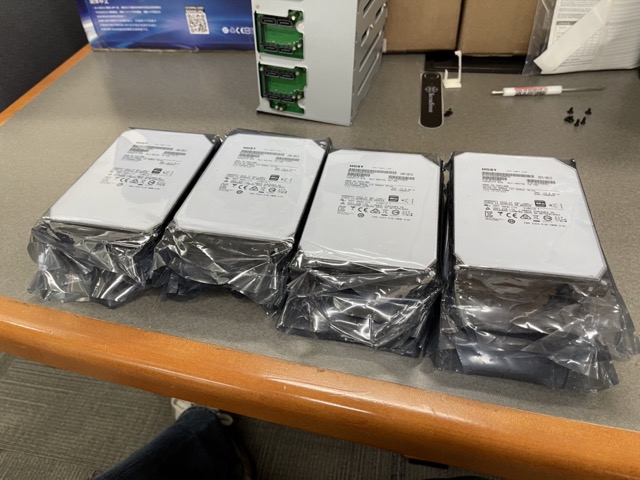
After moving the cables to the labeled SATA ports from the SAS ports on the backplane, and a full power cycle, the LSI card was happily seeing all eight of the 8TB SAS HGST disks I’d procured for use in this system. Yes, that’s right, another doubling in drive capacity and also now in number. QUAD DAMAGE!
Disks online, now it was time to test these used units. It was a great opportunity to use a tool that I’d only recently become aware of, but is fit for this purpose. Ventoy allows you to have a single USB-stick, with as many disk images as you can put on it, bootable to each image on the USB drive using a menu. I first downloaded the latest DVD image of Knoppix, which didn’t load, but then grabbed Ubuntu. After successfully booting to Live, I loaded up GParted, erased all of the volumes on each disk, and then was advised to run badblocks on each disk. With the i7-8700 having a plethora of cores, I started up eight terminal windows, each running badblocks on a disk. It’s not processor intensive, but It’s nice to know that this new box will have more horsepower than I will likely need, while also being somewhat efficient in power, all the while holding a total of 6 cores/12 threads at the ready if needed. A sizeable step up from the Haswell i3 and completely eclipsing the lowly D525 Atom in the QNAP appliance.
The power supply is the last item to be added, and the form factor is a little unusual, but not what I’d call specialized. SFX is a common Small Form size, used in systems that need good power capabilities but using less volume than a traditional ATX footprint. Think of the ATX size, but on a slimming diet, where most of the extra space is seemingly gained in the vertical dimension. There are 1000W variants of this specification, so output power isn’t lacking in availability, that’s for certain. I was able to acquire a SilverStone 500w SFX-L unit, with the -L denoting the version that’s 30mm deeper than the standard spec. This did cause me a little grief with the drive cage due to the modular cable output interfering, but I was able to make it work. The advantage of -L seems to be that it can fit the quieter 120mm fan size. The DS380 also officially supports that version.
One of the complaints and concerns about the SilverStone case I’d heard about from my friend is drive cooling. The DS and CS have at least three 120mm fans drawing air in on the side of the case, and out through the back and power supply. The side-mounted fans do blow directly at the large disk cage, but the airflow isn’t obliged to stay the course and flow over the array. Ingenious owners of these cases have developed 3D printed baffles that screw into the fan’s mounting holes to forcefully direct the airflow over the drive cage. This would cause issues with using a large GPU in the case, and very long SAS cards also. Modifying the baffles for the miniSAS connector to clear is something necessary with the LSI card I’m using, as the connectors point towards the front of the case and extend to the fans.
https://www.printables.com/model/100276-cooling-duct-for-silverstone-d380b/filesMigration
The real challenge is going to be migrating data, and doing it without upsetting what’s already been configured. Ideally I’d like to maintain what I have, but completely change the hardware. This is a feat that wasn’t possible using a device like the QNAP in traditional RAID5 arrays. Disks in arrays like that don’t need to be the same size, but they must all be at least as large as their companions, if not larger, but any capacity above and beyond the smallest drive size is inaccessible. unRAID and the xfs filesystem are adept at making drive pools from disks of disparate sizes work. It’s clever, and the only real requirement is that your parity drive is at least as large as the biggest in the array.
The plan is this: Slowly and methodically rebuild the existing array one drive at a time. If I’d purchased SATA drives I would have considered doing this in the old enclosure. In some ways I’m glad that this wasn’t an option, as the H81I-PLUS ASUS board has a split SATAII and SATAIII array of ports, with two each. Moving the current drives, with parity drive, to the new system, is the first step. With only one of the new drives as the fifth drive available, unRAID can copy it as a second parity disk for the array. Remember, the parity disk is very important, and it can be larger than the others in the array. This process should take some time, but when it’s done I should then be able to stop the array, pull out the smaller parity disk, and then work on the data disks. Do this three times and it should be a new array with four drives, all 8TB, with double the capacity. Real Ship of Theseus stuff right here.
https://wiki.unraid.net/The_parity_swap_procedureWith that done, I should be able to return the original disks to it’s former home, where I could rebuild the array if wanted. Using unRAID, I will be able to then add some of the additional drives to the array, with as many as 12 total. I do plan on using either an SATA 2.5″ or the m.2 SATA drive as cache, which I’ve not done as of yet. It may also be prudent to leave one or two of the big disks dormant and spun down, as backups should either a disk fail or my storage needs suddenly change drastically. This flexibility is why unRAID or TrueNAS are really the best choices for users who want to be able to do more with their storage if the need arises.
Will there be a backup? Maybe. Services like Backblaze are available, though more expensive if run on a NAS, but should really be considered as an option. I do also have a QNAP TS-004, which is a USB3 four-disk external enclosure with 4x4TB in it presently. Shucking some larger SATA drives into this appliance would make for a reasonable backup endpoint, so that’s also a possibility.
So, how did it go?
Despite trying to follow instructions on how to copy the existing parity disk to a new one, I failed to get it right. This resulted in a 16-hour rebuild of both the old and new parity disks. I’m not really in a rush, but my understanding is that a copy would have been much faster. Oh well. I even got this wrong the first time around, accidentally assigning a 4TB disk as Parity 1 instead of Parity 2. This meant that I had to assign an 8TB disk as Parity 1 and start the sync over again.
As for the data disks, well, this is the longest part of the process. Each of the data drives needs to be removed from the array, then the array is started, stopped, then started with the replacement disk in place. A drive sync is then run on the new disk, which takes…a long time. Repeat as many times as you have disks. In the end, however, all disks will be replaced and we’ve arrived back at port with what could arguably be called the same ship.
Next will be adding an SSD cache disk, or disks, in the form of Samsung 850 Pro SSDs connected to the motherboard’s SATA port. This will give us a much faster write speed to the array, even though it does risk that data because the cache write isn’t immediate. Mirroring two SSDs, which I’m likely to do, mitigates this risk somewhat.
https://unraid.net/blog/unraid-6-9s-multiple-pools-support
Finally, I need to remove the 4TB drives from the enclosure and swap in the remainder of the 8TB disks. Then it’s a matter of deciding a few things: Do I want multiple parity drives? Do I leave 1-3 drives spun down as backups for capacity or reliability? I most certainly do not need 56TB of space right now, nor will I in years, but it’s there for use if wanted or needed. This is the flexibility built into some of the decisions made for this NAS, namely the case design and number of ports on hand.
Wrap Up
With all of the disks installed, a mirrored SSD cache array, and everything powered up, it really was like walking onto the same boat, but things just feel a little nicer, slicker, and faster. It’s a little noisier than the U-NAS enclosure, but five fans and eight spinning disks will make some sound pressure. Docker images still work, but load and update faster. SMB file listing issues that I had previously experienced are now gone and the SMB read speed is much, much better. Temperatures of the lower four drives, which are unassigned devices, was much higher than it should have been, was mildly concerning. This was especially odd when the top four disks are 5-8C cooler while being blown on by the same sized fans. A day later and the disk temperature did settle into the mid-30s and have stayed there since.
I still smile when I see 12 threads to use, and a late upgrade from 8GB to 32GB RAM (2xDDR4 2400) means that VMs are now likely going to be a thing. I’ve done some compressing of file-dense directories, which contain 10k- to 100k- files, and it’s amazing to watch the cores and threads all be used. Next could be expanding the array with a second parity disk, one or two more data disks, and possibly a cold drive ready for an emergency. This arrangement gives me much more capability, flexibility, and reliability than before.
Lessons Learned
There are a few things I’d change in this build, some big and some small.
First, I’d look for a 120mm SFX power supply to make it fit easier, or source an SFX-L power supply that doesn’t have the power output in the center. Modularity is nice, but it really gets in the way of the drive cage fitting properly.
Second would be an HBA card which had ports going up, relative to the plane of the motherboard, instead of sideways. This would allow one to more easily use the fan baffle and route cables cleaner. It’s likely that there are equivalent cards, or identical cards in every way, but differing in port orientation.
Third would be going SATA and not SAS for disks. SATA are easier to source, cheaper, and they run cooler. There’s an argument that SAS are more durable, but at what cost? Also, read on to find out why SATA can be better.
Fourth would be to buy that ASROCK AMD board with 12 onboard SATA ports, or any other board with similar capabilities meeting the criteria. This would eliminate the need for an HBA card, opening the possibility of running a GPU in the case for VM gaming or other operations. It’s also more power efficient, as HBA cards do use 7-15W in normal operation.
Last Words
TRY it first. It doesn’t matter what hardware you have for CPU, motherboard, and RAM, as long as it meets some kind of minimums for unRAID, or TrueNAS, or whatever. Get 2-4 drives into an enclosure with a USB stick or boot disk. That’s all you need to get a NAS set up. Try it and I think you’ll find that you will next be thinking, as I did, about how to build it better.
Or shoot for the moon!
More images