One of the most puzzling things about the Apple Silicon MacBook Air in 2024 is that it can only natively support one external display. This even extended to the early 13″ MacBook Pro, which was just an Air with a Touch Bar. I’ve supported many of these devices since their introduction, M1 and M2 chips, 13″ and 15″ sizes. As of this post, there’s only one way to get full support for multiple displays.
Synaptics has a technology called DisplayLink, which they license to many companies from StarTech, Hyperdrive, Pluggable, and more. Download the drivers from their website and it tricks the OS into sharing a virtual display with the adapter, letting a user have multiple displays. It works quite well, but has it’s limitations. One of these popped up recently when upgrading from macOS Ventura (13) to Sonoma (14) and using the Zoom accessibility feature. It’s something that I use often in order to make text easier to read, and is pretty important, so when the display connected to my StarTech DisplayLink adapter stopped zooming I was a little puzzled. But I wasn’t surprised, because Apple has been tinkering and changing things for years and breaking capabilities like this.
In an accidental way I was able to find a solution, however, because it is possible to not only support Zoom on both displays, but unlike in Ventura, each display seems to magnify independently. This is a change from Ventura, where the combined display width and height were treated as a single display. Zooming in on one display or the other would also zoom the other, which wasn’t ideal, but worked.
In switching from a Hyperdrive dock to an older, first-generation 13-port OWC Thunderbolt 3 dock, I was unsure which display was connected to which cable, This dock is very odd in that it’s only display outputs are Thunderbolt 3/USB-C DisplayPort and a miniDP plug. No HDMI or full DP plugs. I was using a miniDP-to-DP cable on Dell displays, but found out that I needed to move it. In this confusion I found that the DisplayLink adapter had grabbed the top bar, making it the primary display. This isn’t the monitor that I would normally use as primary, so I was going to change it but found myself using the zoom motion to make the System Preferences panel larger and had to pause and think about what just happened.
After the Sonoma update, this adapter being set to the secondary display, it no longer zoomed. Instead, it glitched a little bit and stuttered. That it was working was unexpected, and so I checked to see if somehow the issue had been resolved by setting things back up as I had previously. Primary was from the dock, while secondary was from the StarTech adapter. The issue returned. So, I switched it back and the zoom worked as expected and hoped. I thought about using my second display as the primary monitor, and even set it up like that for a few minutes, but thought about the whole situation again.
Why was the DisplayLink adapter working when it was primary? I don’t know, but there must be some kind of priority and feature enabled when it is. Thinking for a moment I then decided that switching the two display inputs couldn’t hurt, so that’s what I did. It worked exactly has I’d hoped, and is very much a solution to the problem I’d has since upgrading to Sonoma.
As mentioned earlier, I can now zoom in on either monitor independently of the other. In this window I’m zoomed in, while the other is zoomed out to the full, native resolution. There’s no choppiness or lag, which I did admittedly remember happening on the DisplayLink adapter under Ventura. This behavior is why I wouldn’t have considered the StarTech USB adapter fit for the primary display. Now, however, it works easily as well as the display connected to the dock.
I had emailed Synaptics earlier to ask if this was a known issue and received a response that it was. The software as of this writing is 1.10.0 Build 117 and was released in October 2023. No beta is available. I have emailed that same contact to inform them that there is a possible resolution for some users and I hope that they will acknowledge this and that it’s already a known fix.
I’ve been part of the WiGLE Project, as a contributor, since 2017. I have a much longer history with the idea and practice of “wardriving” that extends to the early days of wireless internet as a thing. Wardriving was something we would do with a PCMCIA wireless card, an antenna, and a laptop. Or in my case, a portable PDA running Windows Mobile. Most of the data contributed to the greater project is done so with Android phones, which makes sense because they have good antennas, GPS, and respectable processors. Things are getting weird though, and some devices that are neither “computer” nor “phone” are becoming more popular in the fringe. Let’s talk about my step into this new world.
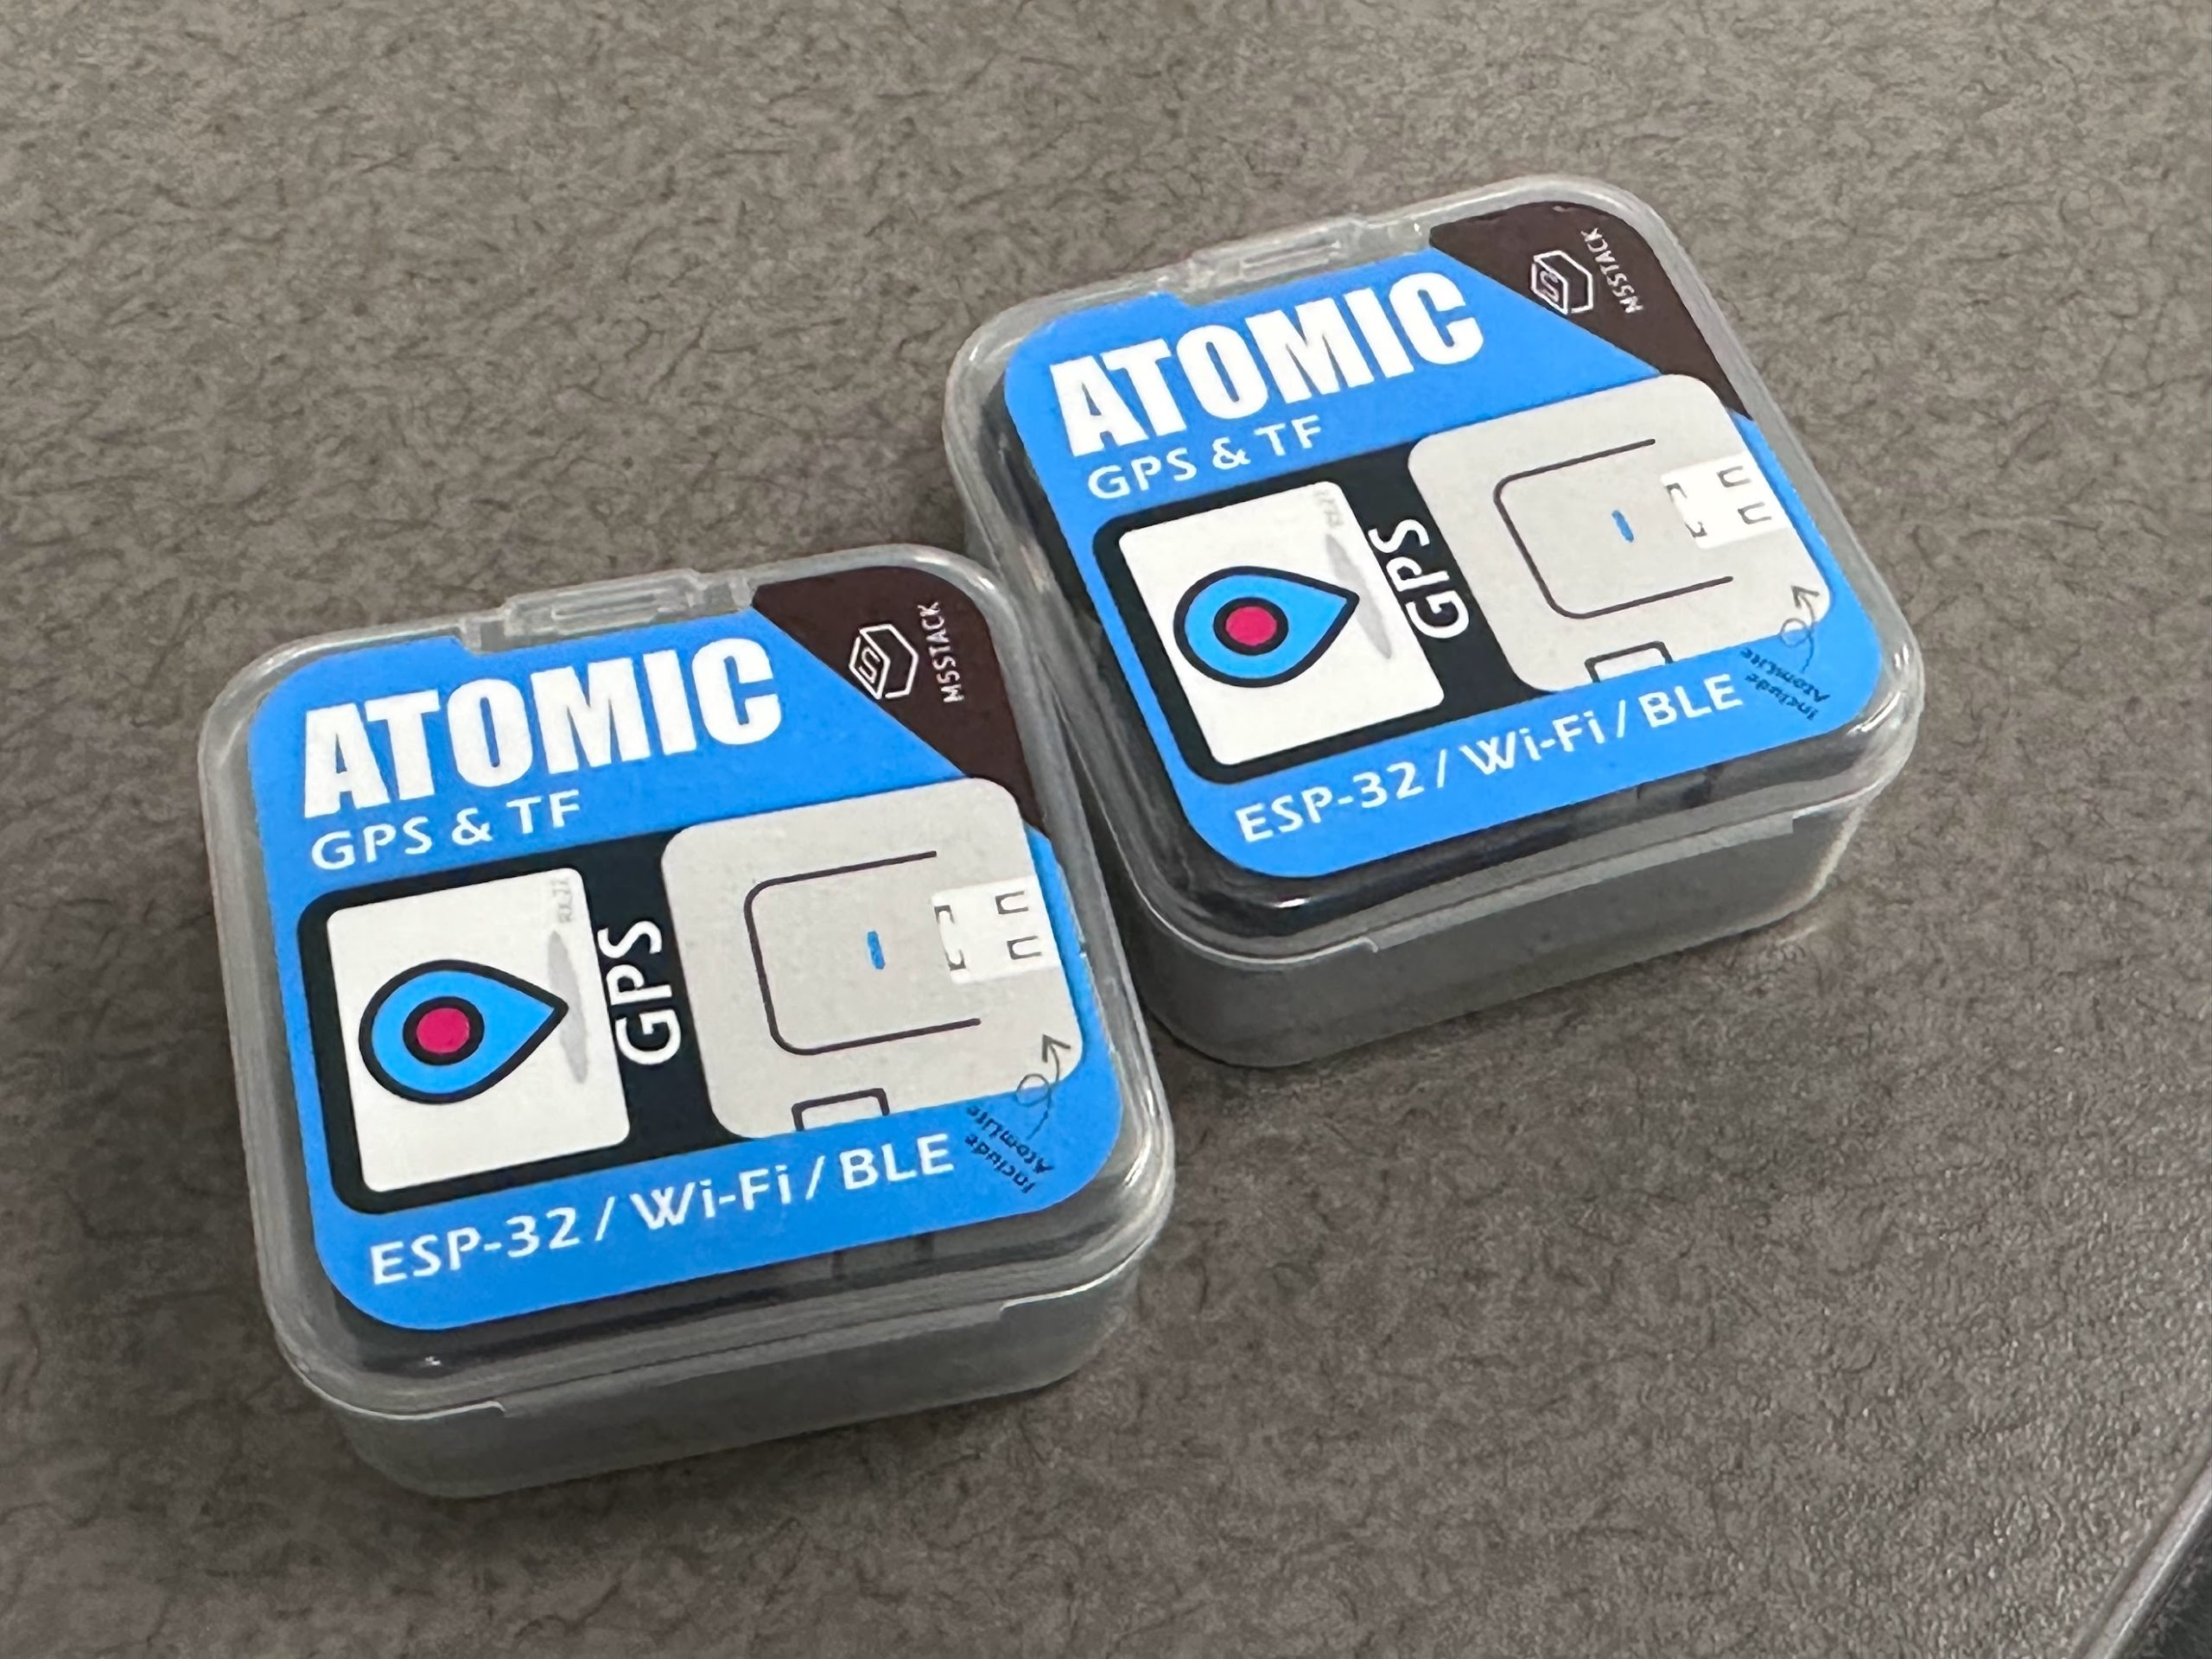
More creative members of the community have latched on to the small, cheap, and powerful ESP32 devices that are increasingly competent and accessible. They’re easy to code for and program, a favorite in DIY projects, and are turning up in some compelling packages. One such project is the M5Stack AtomGPS device. It’s a combination of the M5Stack Atom Lite ESP32 unit, plopped into a saddle that includes SD and GPS, which is a critical part of the WiGLE project.
These are affordable, when they’re available, and cost around $30 USD each. This includes the Atom unit, the GPS saddle, and a USB-C to USB-A cable. Add a 4GB-32GB SD/TF card and you’re good to go for hardware. I obtained mine from Mouser, but other sources include DigiKey. Software, well, that’s a different story. Buckle up!
I do not regularly use ESP32 devices, nor Arduino, but I am loosely familiar with the software IDE. I chose to use Windows for my firmware flashing platform, just as a matter of availability, so here’s where it got interesting.
Note that I am an ESP32 amateur. This guide is merely a verbose interpretation of the README.md. Refer first to that guide, which is updated frequently, and follow this one if you’re looking for another option.
Installing Git is easy, especially if you choose the Portable installer. Using the instructions here, or the code above, you can clone the repo. This will place a folder called “AtomGPS_wigler” inside of your Git Portable directory, which is probably in Downloads if you’re using Windows. Why did I prefer the Portable version? It’s quick and easy to use and doesn’t integrate functionality with your computer, making it perfect for a small project like this. The Arduino IDE is also a pretty straightforward install, and it’s an easy interface to use. Once that’s installed there are two very important things to add for the M5Stack Atom specifically: the board and the libraries.
Add the M5Atom libraries, and all of the dependencies, under the Library Manager tab on the left side of the Arduino IDE:
Copy the URL to the library json below, then go back to the Arduino IDE, into File > Preferences, and let’s add this Espressif board library in the “Additional boards manager URLs” area and click the icon to the right, confirm the URL, and click ok.
Select the Boards Manager tab on the left, search for “esp32” and install the Espressif Systems package.
Now make sure that you have an SD/TF card formatted in FAT32, MBR. 4GB-32GB are tested/supported. The slot is on the back side of the GPS saddle, and has that little click in/out mechanism. Plug the AtomGPS in to your computer and get ready to flash.
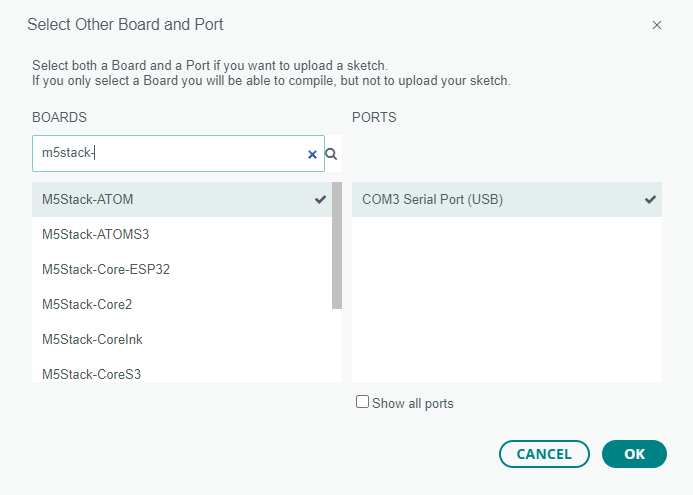
Open the repo clone file called “AtomGPS_Wigler.ino” and make sure that the board type is set to M5Stack-ATOM or M5Stack-Core-ESP32. I have both of these here because of mixed success. One should work as expected, while the other may fail.
Restart the Arduino IDE.
Click Upload in the IDE toolbar and wait for the magic to happen…or errors. If things go well you’ll see a white cascade of the flashing process, after which the device will be rebooted. If all goes well, you should see a purple, then green LED flashing on the unit. If it’s red, well, that’s a problem. In my case this meant an older problematic version, which I will cover a little bit later. Future versions fixed this issue and the purple/green is what you’ll be greeted by.
Okay, yes, that’s all it does. It powers on, it gets a GPS fix, and it scans. Lines are being written to the SD card in a unique file per boot. These are compatible with WiGLE and can be uploaded at your convenience or the next time you see that hot shot delivery van driver you gave $20 to put it in the glovebox…
Now the story begins, as does the other way to flash the AtomGPS:
All of this, and my first try at a pair of new AtomGPS units failed. I spent more time than I care to total in troubleshooting why, until a fellow user pointed out that the code developer noted some reports of SD card detection issues in the older 1.3.2 version. This is the one I was trying to use, and instead of making changes to the code to fix SPI, I decided to use esptool, the alternative way to directly flash a .bin file.
There is a driver from FTDI that I can recommend downloading and installing from here and it is referenced from the M5Stack Github. I have found this not to be necessary, however it’s a simple install.
To use esptool I simply opened the Windows Store and installed the latest version of Python available at the time (3.xx). This done, I opened a command prompt and installed esptool with the “pip install esptool” command, which took very little time. In some environments it would be possible to run “esptool.py” if environment paths were set up properly, but instead I used “python -m esptool” with some arguments:
Note: versions mentioned below have been superseded by 1.4 and above
Make sure that when you’re copying this code that you replace [PORT] with something like COM3 and do not include the brackets in your script. Ask me how I know that it doesn’t work with brackets…
This directly flashes a .bin file, which needs no libraries or dependencies as It’s a full image, and if it writes successfully then the firmware is good. This done, my first of two AtomGPS units was working with a 16GB SD card. I totally expected the second to work just the same, but it was not so easy. Using a 4GB card I was unable to get the second one to work with esptool and version 1.3.2. Frustrated, I flashed 1.3.1, which was in the Git clone folder. No luck, but in some frustration I swapped in a 32GB SD card and it booted up immediately. This was a surprise.
So, what would you do next? Flash 1.3.2 of course. Did it work? No!
So, after a flash back to 1.3.1 and a few minutes of running, I checked the SD card for the AtomGPS csv files which were now present. It’s not a matter of how well it works, at this point, but that it does. The developers and community will add features and improve some of the code, but there’s not a really compelling reason to make sure that the devices are up-to-date. So, in the interest of not spending any more time on these in the immediate future I’ll be content with two of the AtomGPS units running different versions of the software.
Lessons learned? Plenty. I should have checked with the developer to see if there were any known issues. This would have saved me a lot of time, but it wasn’t all in vain. Having more SD cards available is certainly a plus. Knowing that the developer provides older .bin files in the Git clone was a handy thing because I could fall back on older code to avoid new features and potential issues.
Would I recommend an AtomGPS or other dedicated WiGLE device? Yes. These are super handy to put in a vehicle or somewhere that either has a lot of traffic or itself travels a lot. It’s not necessarily a device that needs a file dump and upload daily, or even weekly. I’ll be putting one in each car and uploading the files when I think it might be good. I’ll also keep using a phone too, because you can never have too many antennas…
Thank you to Luke Switzer for the software development, Lozaning for inspiring it, and pejacoby for showing off the project on social media.